How To Automate Android Apps Using Appium
Wasiq Bhamla
Posted On: February 11, 2024
36 Min


The dependency on mobile applications has been on the rise over the past few years. Therefore, keeping up with the pace and delivering customers the highest quality mobile apps is important. If we look at the user base of different mobile operating systems, we can see that Android leads the chart on a global scale.

For seamless and efficient mobile automation testing, various mobile app testing tools exist, like Appium, Espresso, and more. However, Appium is one of the most popular automation tools, and it was relatively easy to get started because of its similarities with Selenium WebDriver.
Also, it supports different programming languages like Java, JavaScript, Python, C#, Ruby, etc., which gives more flexibility to testers who can use Appium with their preferred programming language.
In this mobile app testing tutorial, we look at how to automate Android apps using Appium. To delve deeper into the realm of Appium, explore our dedicated hub focusing on Appium Interview Questions.
TABLE OF CONTENTS
- What is Appium?
- Appium Architecture – How Does Appium Work?
- What is Android Automation Testing?
- Getting Started: How to Automate Android Apps Using Appium
- Why Use Real Android Devices on the Cloud?
- Demo: How to Automate Android Apps Using Appium
- Limitations of Using Appium
- Common Errors and Troubleshooting Steps in Appium
- Best Practices to Automate Android Apps
- Frequently Asked Questions
What is Appium?
Appium is an open-source mobile app testing framework to help automate the testing of Android and iOS apps. Since latest version of Appium is 2.0.0, many new changes have been introduced that further enhance the overall functionality of Appium.
To mention a few recent changes, it has now decoupled drivers from its command line installation. It also introduced a way to override, alter, extend, and add new functionality to Appium by creating plugins. It also encourages using the W3C Protocol for automation compared to the earlier mobile JSON Wire Protocol.
If you’re new to Appium, this tutorial can provide an easy-to-follow guide on performing mobile app testing.
In the next section on how to automate Android apps using Appium, let’s discuss the architecture of the Appium framework.
Appium Architecture – How Does Appium Work?
Appium is an HTTP server written in Node.js that exposes the REST API. The Appium Client communicates with the Appium Server via REST APIs handled using the W3C Protocol.
With the Appium 2 release, the Appium Drivers and Appium Plugins are separated from the Appium Server. Hence, we need to install the Appium Drivers and Appium Plugins separately.
The following diagram shows the working of Appium 2.
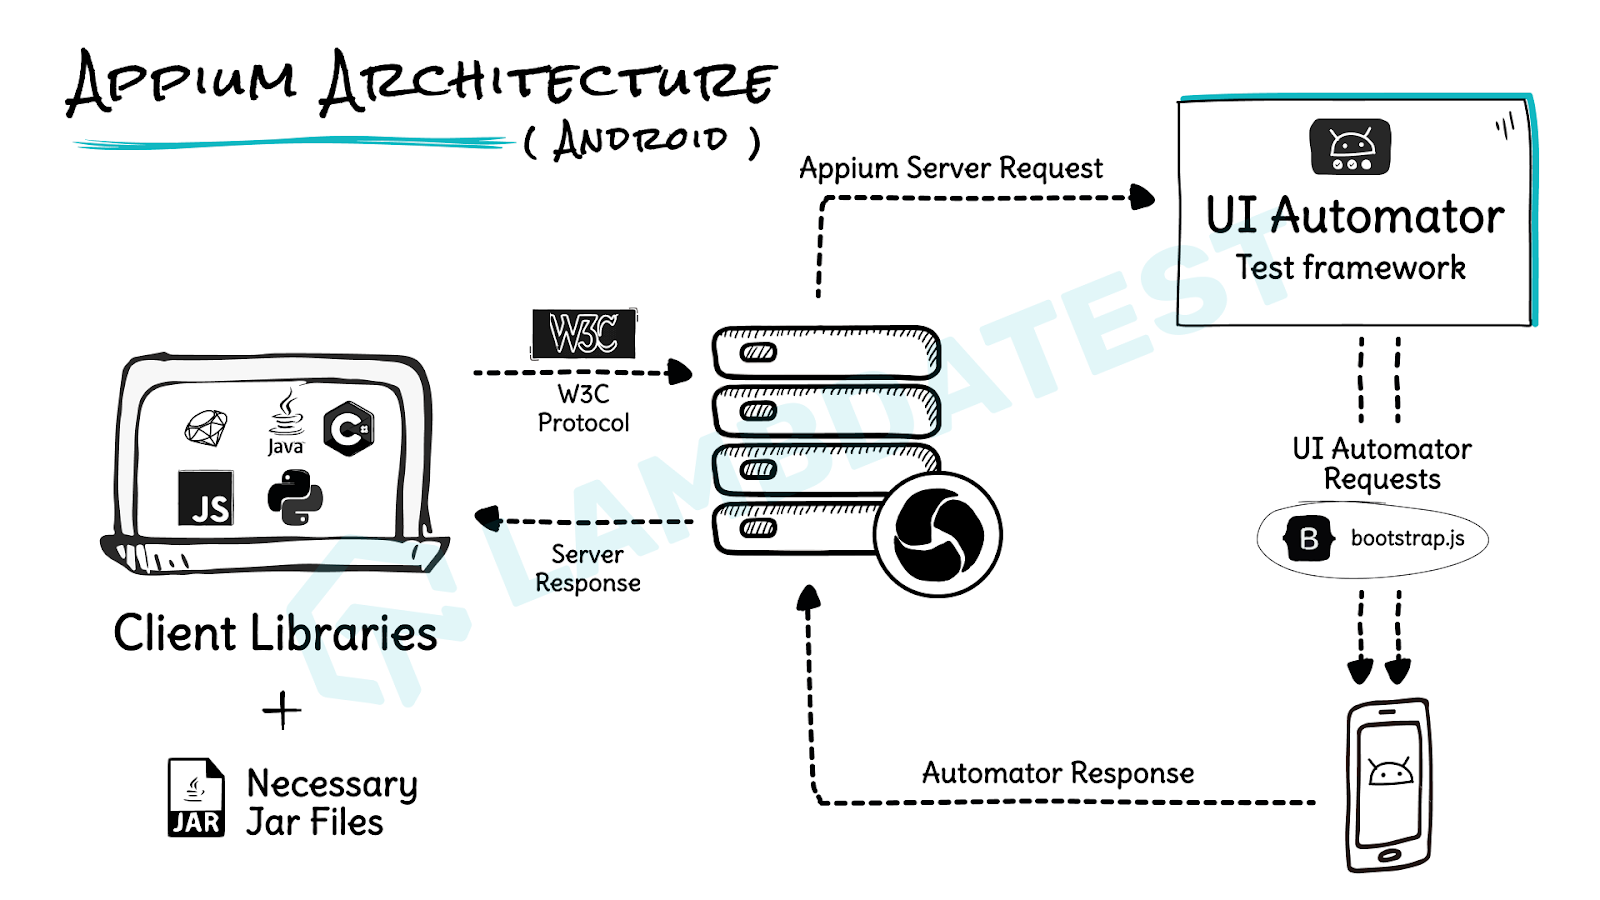
The Appium Client initiates the creation of a new session by sending a request to the Appium Server. The request sent by the Appium Client to create a new session consists of the information in key-value pairs that are provided using desired capabilities.
Appium Server can differentiate between platforms such as Android and iOS based on the desired capabilities provided and launch a new session on a real mobile device or simulator/emulator.
The Post/wd/hub/session API endpoint is used by the Appium Client to start a new session. Upon creating a successful session, the session ID is sent back in response by Appium. This session ID is used by the Appium Client and the Appium Server to communicate with each other and accordingly execute the Appium commands to perform actions on the real or virtual device.
Now that you have understood the Appium architecture, let’s look at what Android automation testing is. After that, we will head towards the main focus of this tutorial, i.e., how to automate Android apps using Appium.
What is Android Automation Testing?
Android automation testing is a process where testers use test execution tools to automate the testing of Android applications. This testing is done to check the functionality, performance, and usability of Android apps. To achieve this, testers write test scripts to simulate user interactions such as tapping buttons, entering text, and swiping the screen.
There are several advantages to automating Android apps. First, it saves time and effort by automating repetitive tasks. This allows QA testers to focus on more complex testing scenarios. Additionally, automated tests can be run more frequently and thoroughly, increasing test coverage and catching regressions quickly.
In the next section, we will learn how to get started to automate Android apps using Appium.
Getting Started: How to Automate Android Apps Using Appium
Automating Android apps using Appium is a powerful approach to ensuring quality and efficiency in your mobile testing process.
To streamline your automation and enhance your testing strategy, consider using KaneAI by LambdaTest. KaneAI is a GenAI native test agent that not only helps in creating tests but also offers the capability to plan tests intelligently using natural language.
With KaneAI, you can create app tests seamlessly and adapt your tests to various scenarios. This integration allows you to prioritize tests effectively, handle different severity levels, and ensure robust testing for your Android applications.
For Appium to run successfully and automate Android apps on your machine, you must set up your machine correctly.
Pre-requisites
In this section of this blog on how to automate Android apps using Appium, let’s see some prerequisites required to automate Android apps.
Install Node.js
Install Node.js v16 LTS using Node Version Manager (NVM) by executing the following command on the terminal or command prompt on your machine.
|
1 |
> curl -o- https://raw.githubusercontent.com/nvm-sh/nvm/v0.39.3/install.sh | bash |
This command will download and run the installation script on your machine to install NVM. Once NVM is installed successfully, you can install Node.js v16 LTS using the following command.
|
1 2 3 4 5 6 7 |
> nvm install lts/gallium Downloading and installing node v16.19.0... Downloading https://nodejs.org/dist/v16.19.0/node-v16.19.0-darwin-arm64.tar.xz... ######################################################################################################################################## 100.0% Computing checksum with shasum -a 256 Checksums matched! Now using node v16.19.0 (npm v8.19.3). |
Confirm the installed Node.js version by running the following command:
|
1 2 |
> node -v V16.19.0 |
Download and install the following to compile and run your tests successfully:
- JDK 11: You can download the installer from the link provided for your machine and install it, or you can also use Homebrew on your macOS machine to install the JDK using the following command:
- Maven: You can download the distribution package from the provided link, unzip it in the location of your choice, and set the M2_HOME, or you can simply run brew install maven on your macOS machine.
|
1 2 |
> brew tap homebrew/cask-versions > brew install --cask temurin11 |
Install Android Studio
Install the installer from the Android Studio page. Open the SDK manager and install the following selected packages.
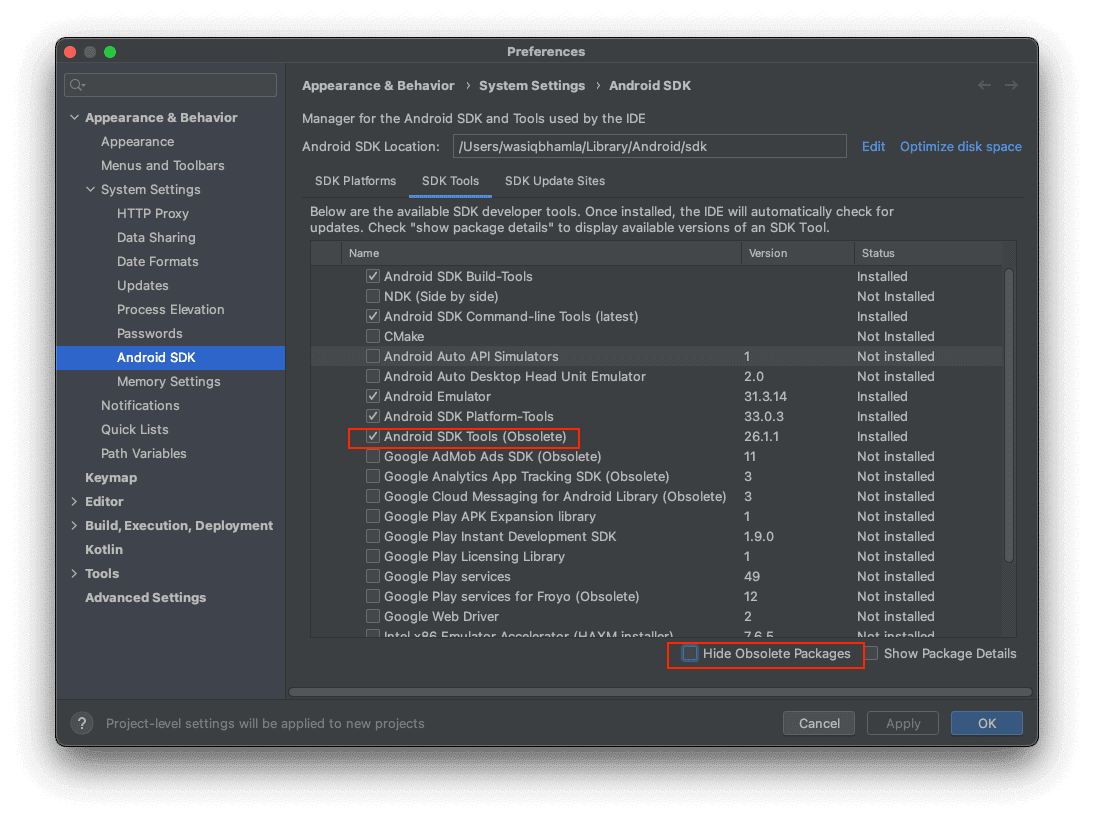
Notice the package highlighted in red. This package will only get visible when you uncheck Hide Obsolete Packages. All these packages are required to automate Android apps.
Set up the ANDROID_HOME environment variable pointing to the SDK path. Also, we need to update the PATH variable with paths to the emulator, tools, platform-tools, and cmdline-tools paths.
|
1 2 3 4 5 6 |
export ANDROID_HOME="/path/to/Android/sdk" export PATH=$PATH:$ANDROID_HOME/emulator export PATH=$PATH:$ANDROID_HOME/tools export PATH=$PATH:$ANDROID_HOME/tools/bin export PATH=$PATH:$ANDROID_HOME/platform-tools export PATH=$PATH:$ANDROID_HOME/cmdline-tools/latest/bin |
Install Appium Server CLI
To run Appium to automate Android apps on your machine, you will need to install the Appium command line tool to manage the server and drivers.
Run the following command on your terminal to install the Appium CLI.
|
1 |
npm install -g appium |
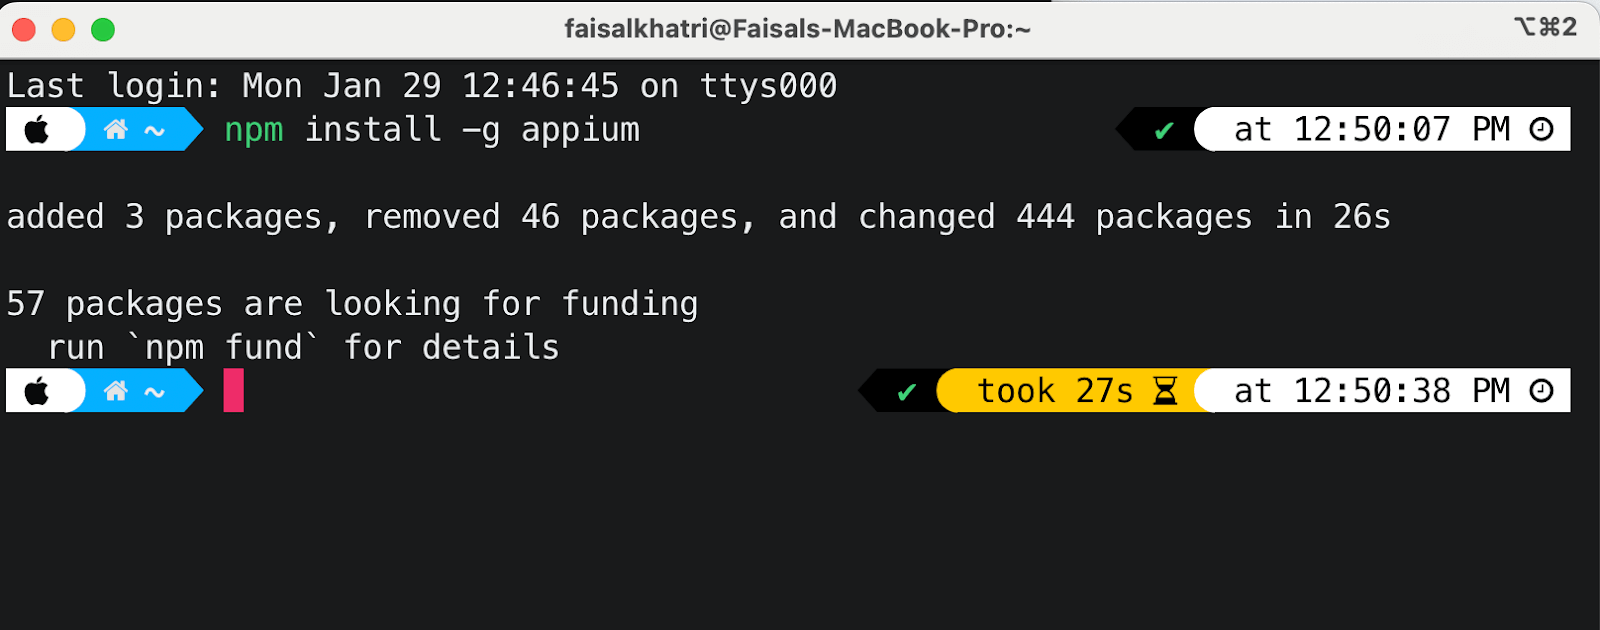
This will only install the latest Appium v2 CLI on your machine.
Run appium -v command to confirm that v2 was installed successfully.

While setting up Appium Server CLI for your mobile app testing, it’s essential to have a solid grasp of Appium commands. To simplify your journey, refer to our Appium Commands Cheat Sheet. This resource will help you master the command-line interface and enhance Appium testing capabilities.
Get Available Appium Drivers
With Appium 2.0, they have decoupled the Appium Server and Drivers. So when you installed Appium CLI, it did not install any drivers.
Run this command to see all the supported drivers by Appium.
|
1 |
appium driver list |

Install Appium Driver
Now, from the list of supported drivers, you can install any required drivers per your requirements.
To install a specific driver, in this case, the uiautomator2 driver for Android, run the following command:
|
1 |
appium driver install uiautomator2 |

To check if the driver is installed, you can again run the command to list all the supported drivers, and it will show a tick (✔️) next to the installed driver.
Install Appium Doctor
To check whether your machine setup is done correctly now, you would need the appium-doctor to help us check it.
To install appium-doctor, run the following command:
|
1 |
npm install -g @appium/doctor |

To check that the appium-doctor was installed successfully, the following command can be run on the terminal.
|
1 |
appium-doctor --version |

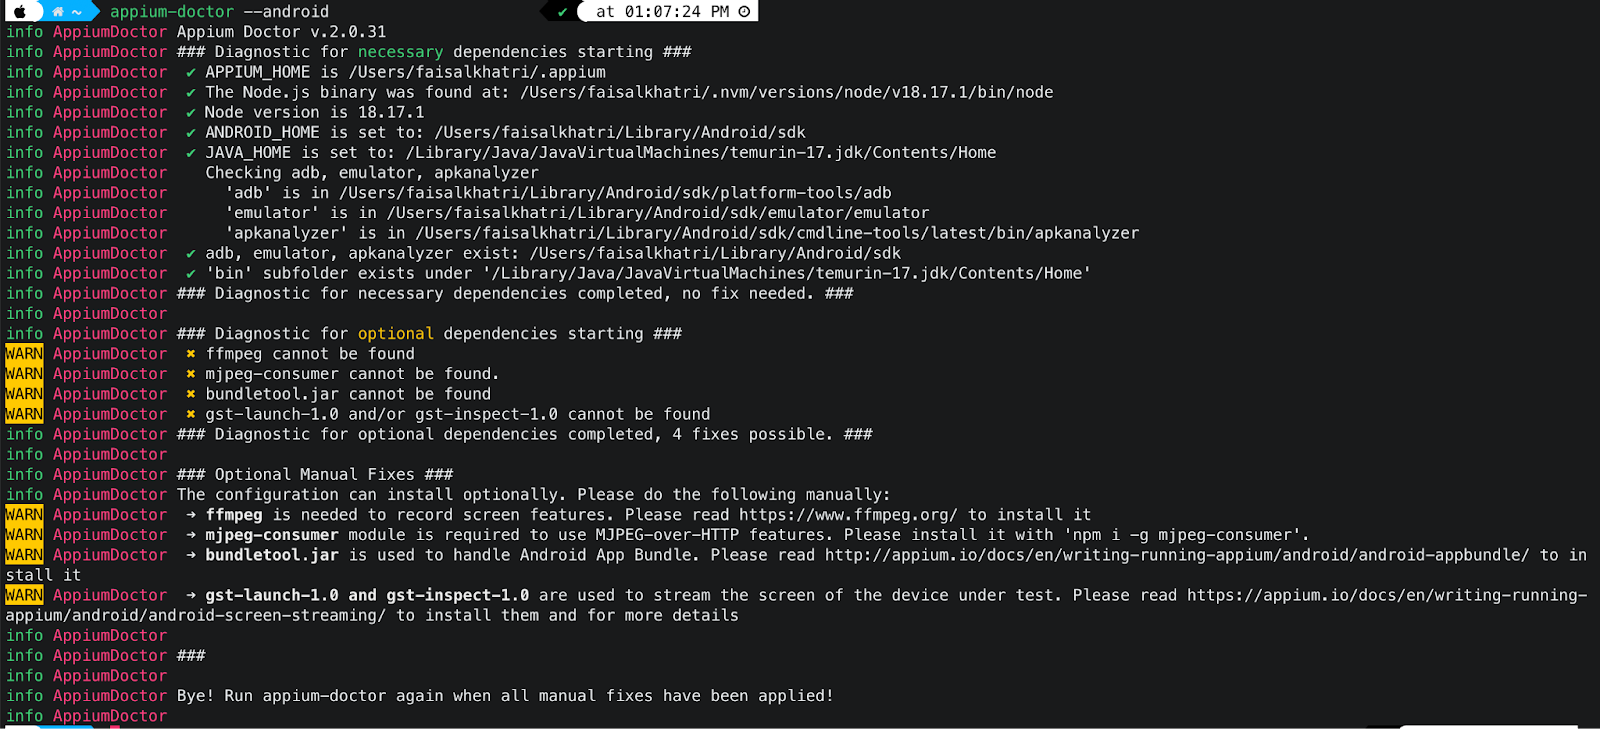
Check Machine Setup
Once Appium Doctor is installed, run the following command to check the machine setup to automate Android apps:
|
1 |
appium-doctor --android |
Start Appium Server
To start the Appium Server using Appium v2, run the following command:
|
1 |
appium server --address localhost --port 4723 --use-drivers uiautomator2 --base-path /wd/hub |
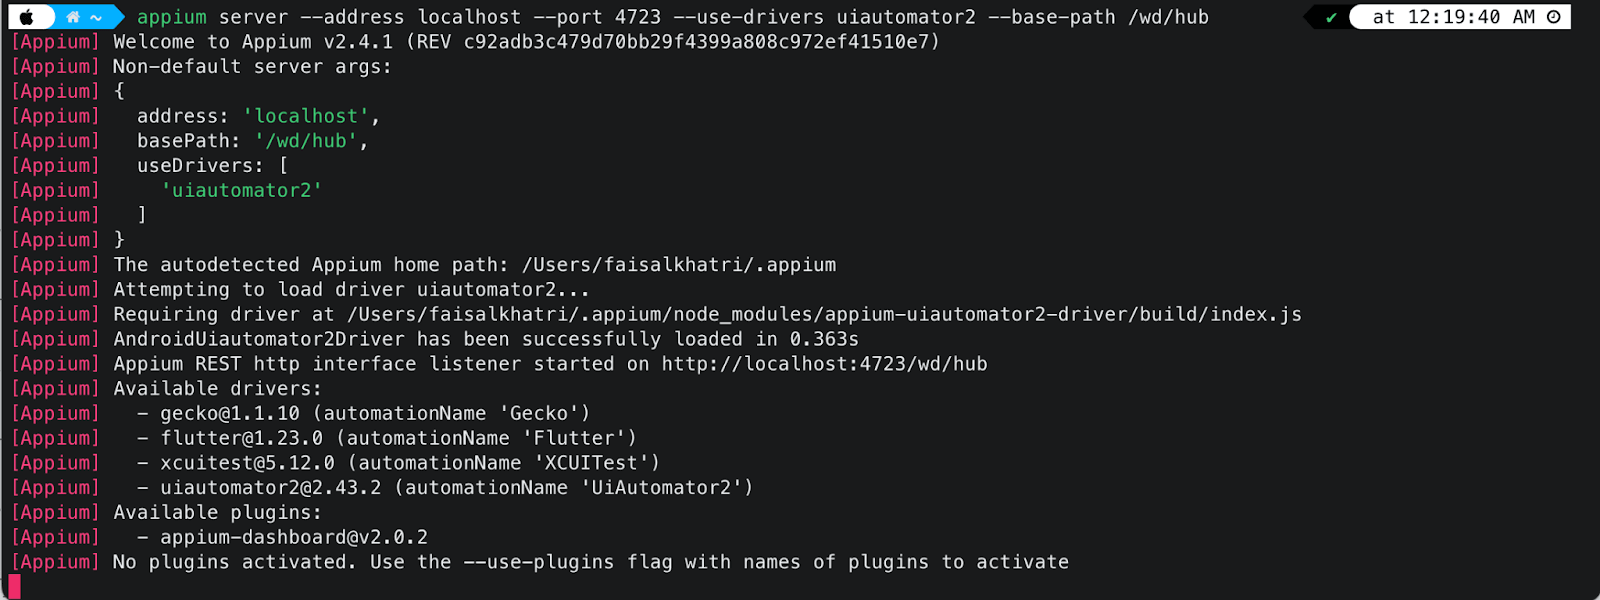
Once the server starts, it’s ready to connect to this server instance, communicate with the device, and execute the tests using this session.
To stop the server, you must press Ctrl + C.
Setting up the Android Device
In this section of the blog on how to automate Android apps using Appium, let’s see how to set up an Android device.
The last step before we automate Android apps using Appium is setting up the device to make it ready for Appium to connect with it. The device can be a virtual emulator or your real device. Let’s see how to set up both kinds of devices properly.
Create Android Emulator
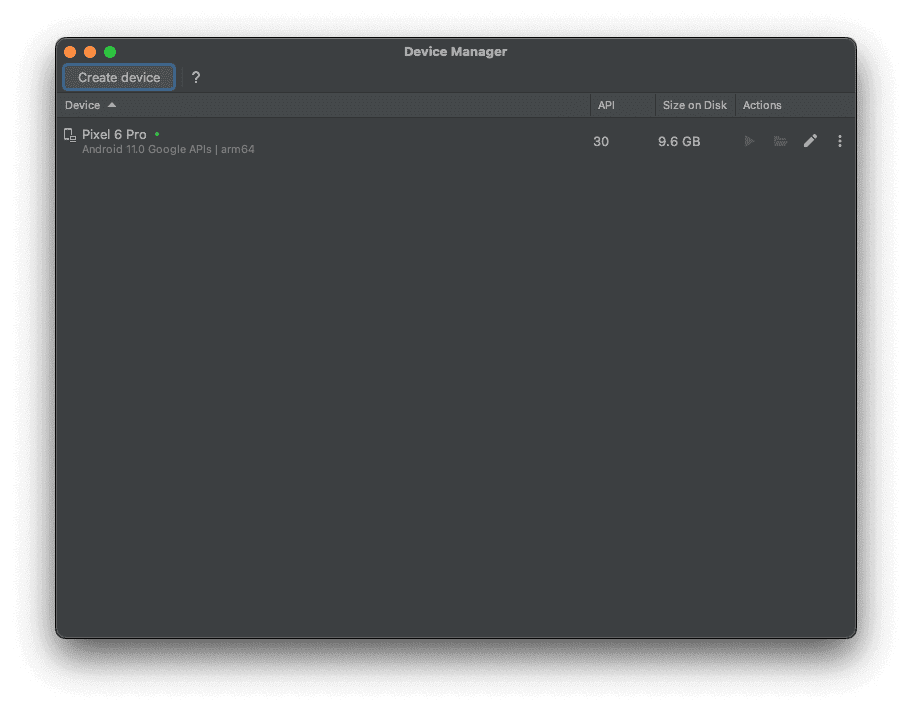
Let’s create an Android emulator using Android Studio.
Open Android Studio and click More Actions > Virtual Device Manager, as shown below.
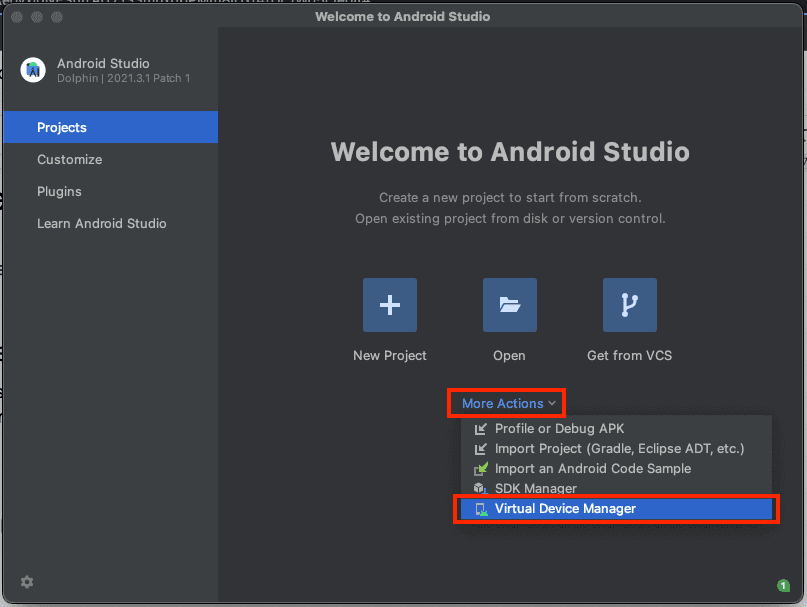
This will open up Device Manager, containing a list of existing virtual devices and an option to create new ones. This is what the Device Manager screen looks like:
Start the Emulator
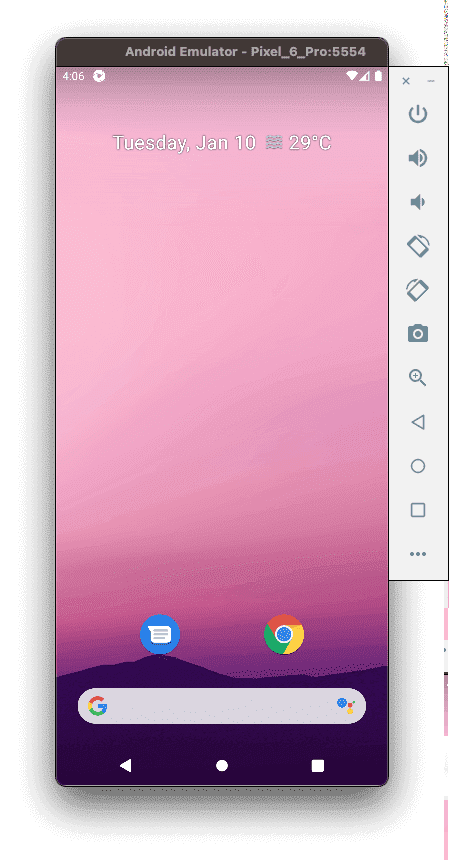
To start the emulator, click the (▶️) button in the Device Manager screen corresponding to the device you want to start. Once you start the emulator, it will take some time to load. Check out a sample emulator screen below:
The first step after you have set up your machine is identifying the element locators for the Application Under Test (AUT). Let’s look at how to inspect elements for Android applications.
Install Appium Inspector
Appium Inspector is a desktop-based application that can be used to connect to a local Appium Server session; we started using the Appium Server application and the local device (whether emulator or physical device) or even a cloud-based real device where it will install the application under test on the device, launch it and will help you inspect the elements of the application.
To download the Appium Inspector, visit its GitHub Release page and download the application compatible with your machine’s operating system. Once the application is downloaded and installed, it will look like:
On this screen, you can create desired capabilities for different devices and save them for later use.
With these capabilities, you can select any capability you want to run and the server instance where you want to run this capability. It can be either a local Appium Server or any of the supported cloud platforms, which you can select from the Select Cloud Providers tab, which will list all the supported providers.
Inspect Elements Using Android Emulator
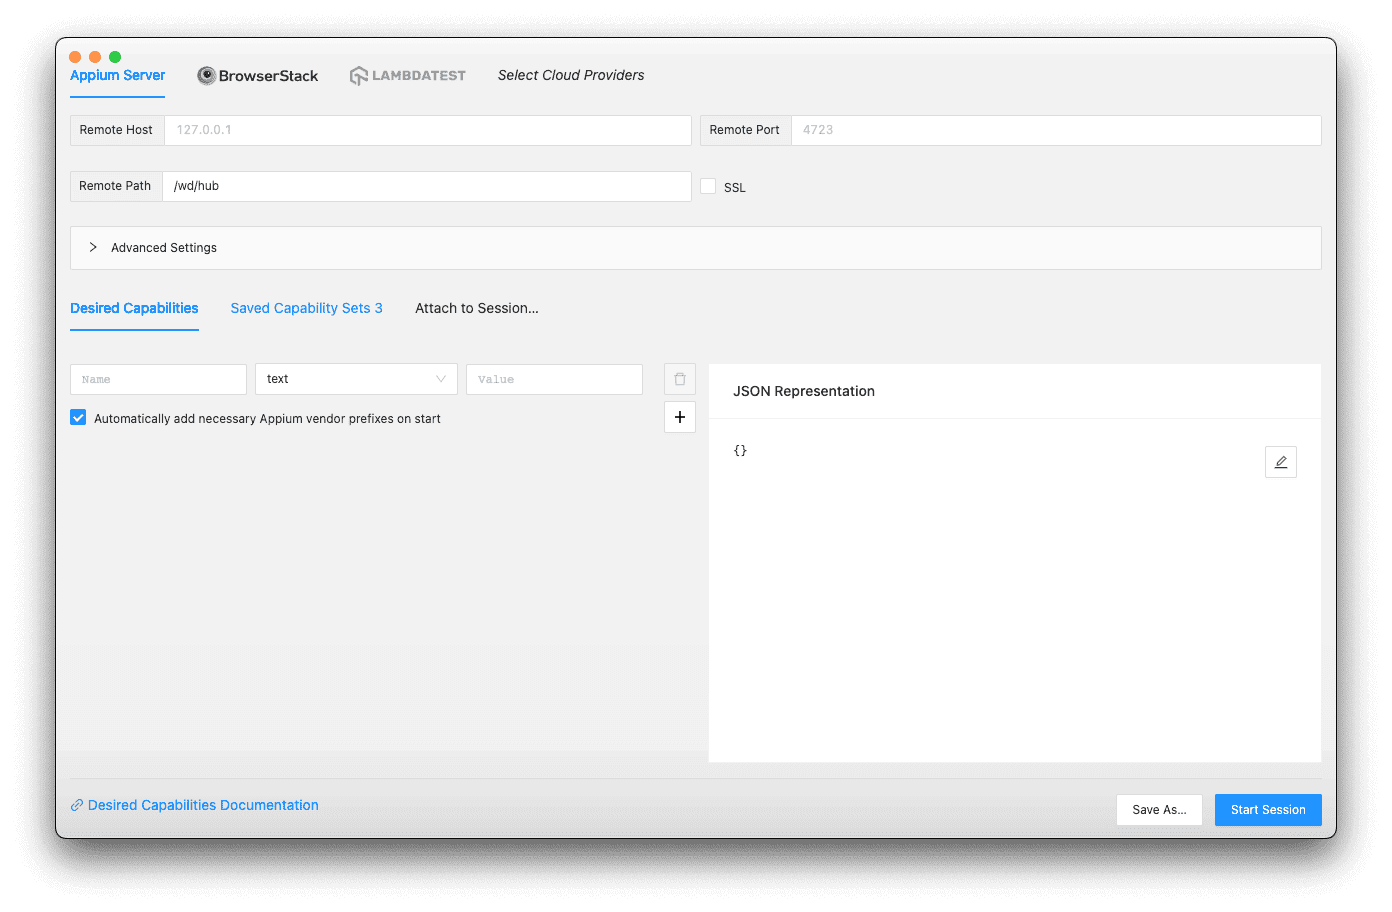
To inspect the element, select the capability from the Appium Inspector, update the server details to connect to, and then click on the Start Session button. Let’s see how this screen looks before you start the session.
Here, one thing to notice is the base path, which is provided as /wd/hub, and we don’t have to provide Remote Host and Remote Port as it defaults to the localhost and port is 4723, which is where you started the Appium Server using the server application.
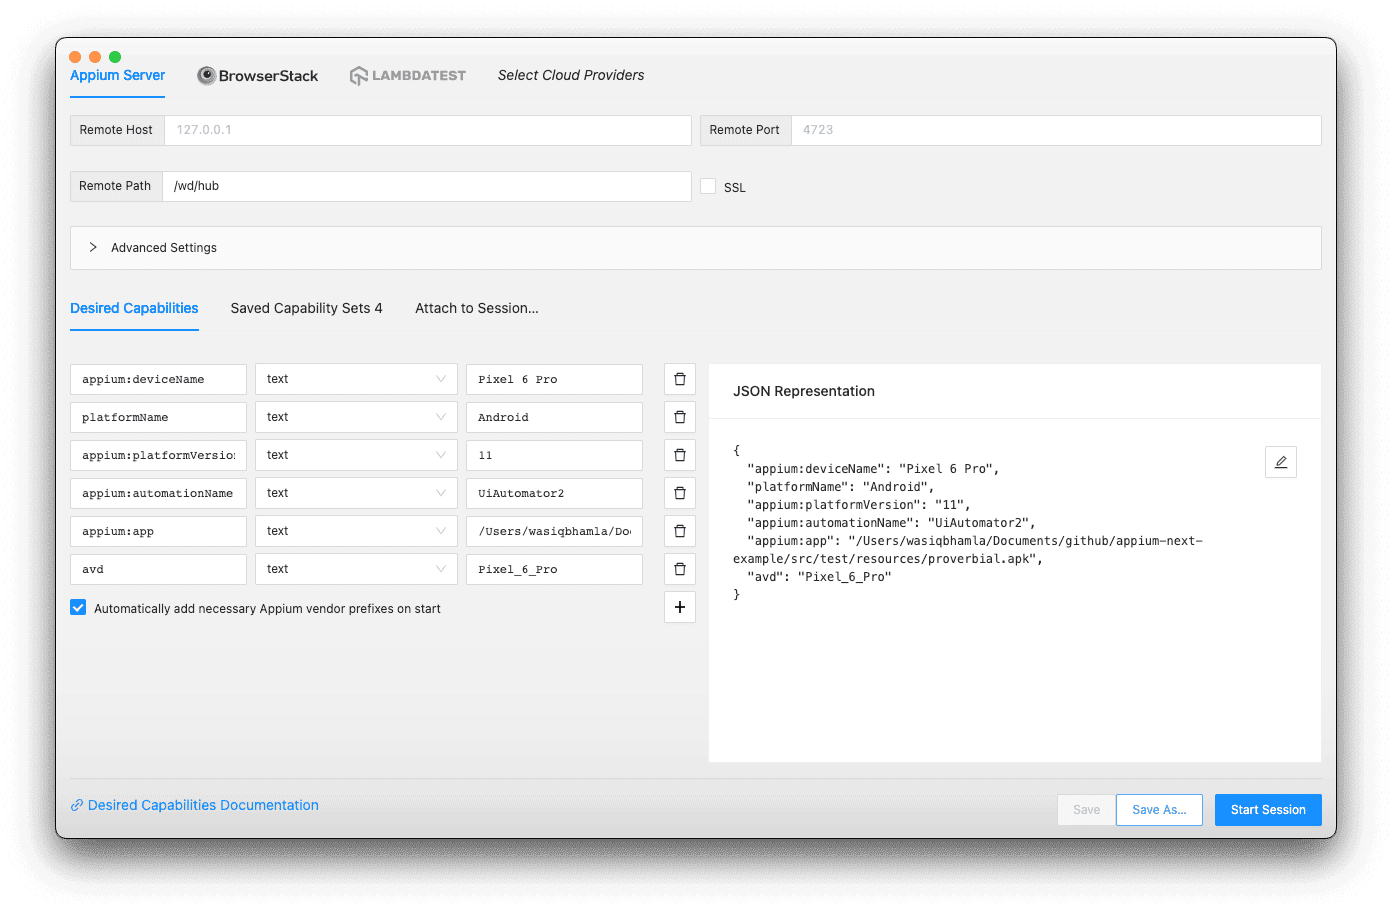
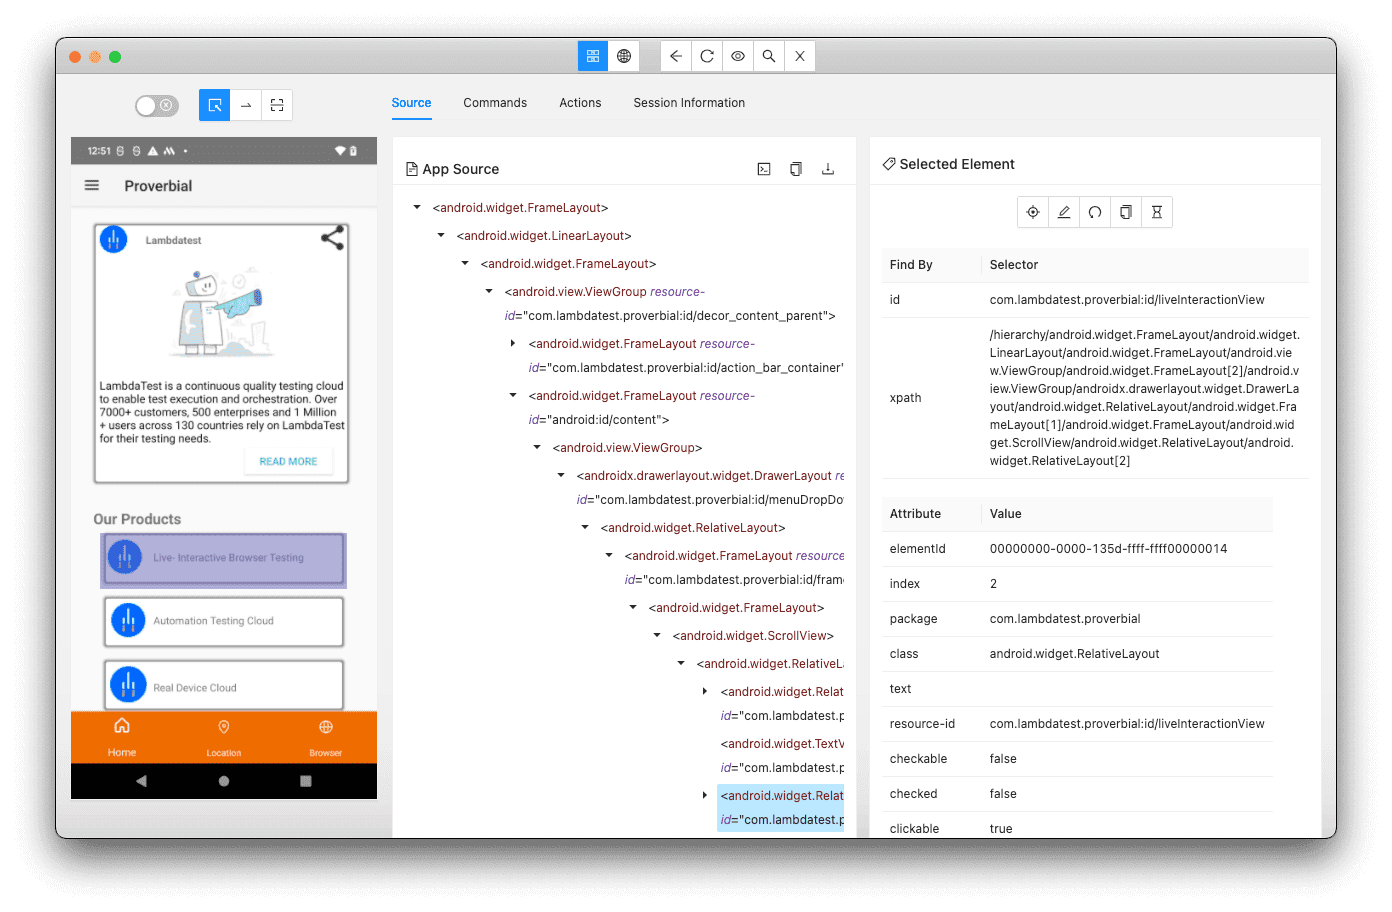
Once the session begins, the Android emulator will start as mentioned in the capability avd, where you must mention the emulator name you created using the Android Studio virtual device manager. This is how the inspector screen looks when the session is started.
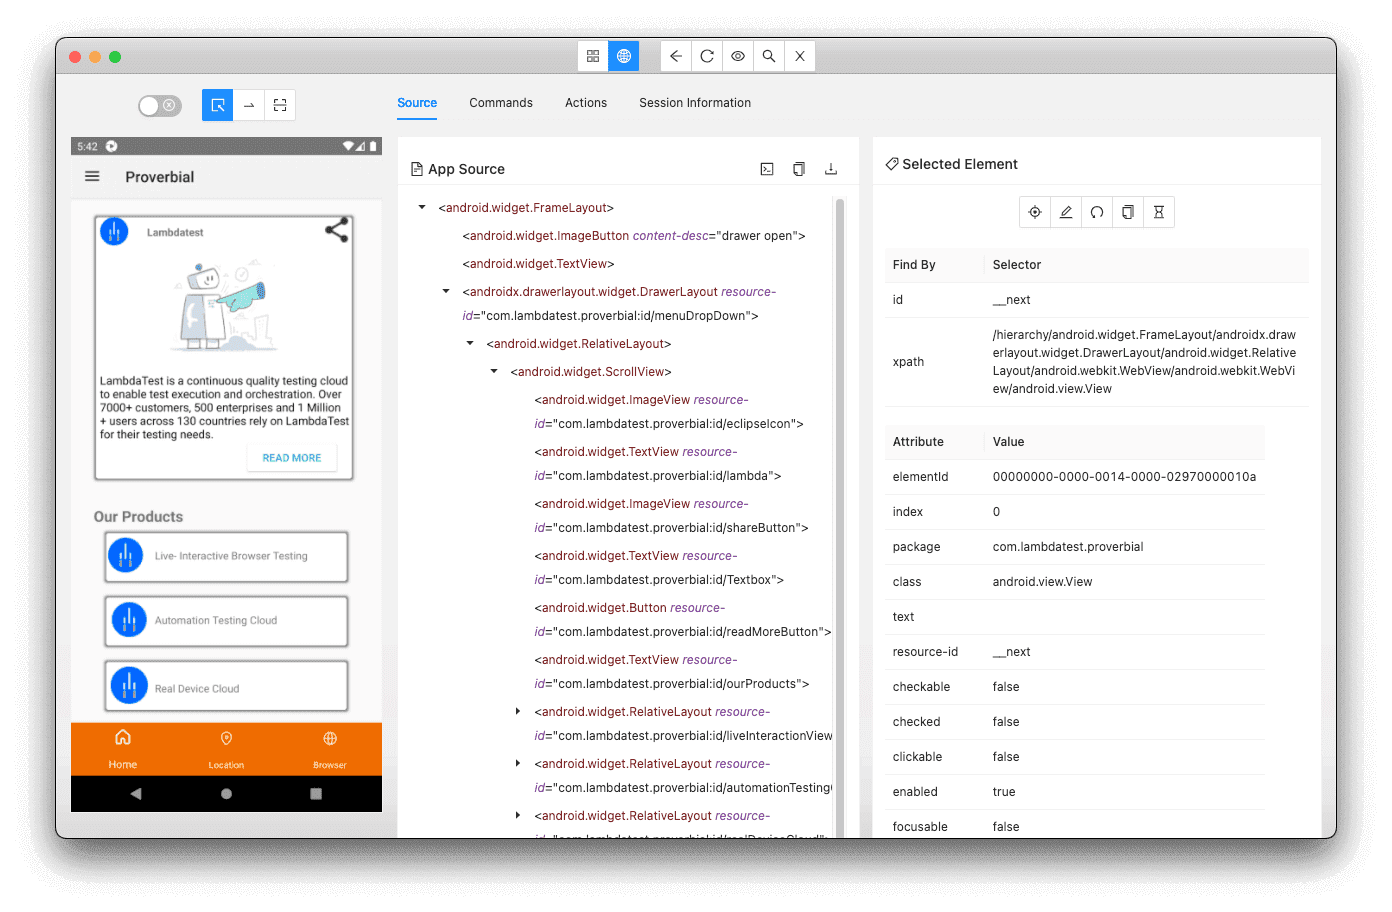
On this screen, you can click on the element on the application screen, mirrored on this inspector from the device. You will be able to see the properties of that element on the right-hand panel. You can see all the element hierarchies in the XML tree in the center panel.
To automate Android apps, you can also use cloud-based devices if you don’t want to set up a local emulator and still want to inspect Android app elements.
In the next section of this tutorial on automating Android apps using Appium, we will explore the importance and process of using real device clouds for inspecting elements and automating Android apps. Watch the video below to see how device logs can simplify the inspection and debugging process.
Why Use Real Android Devices on the Cloud?
Before we move ahead in this blog on how to automate Android apps using Appium, let’s first understand what real device cloud providers are. Real device cloud providers offer Appium automation on the cloud grid that offers real devices, platforms, and browsers hosted on the cloud.
AI-Native test orchestration and execution platforms like LambdaTest provide an online device farm of 3000+ real devices and operating systems to perform real device cloud testing at scale over an Appium grid. Using LambdaTest, you can also automate Android apps on online Android emulators.
You can also subscribe to the LambdaTest YouTube Channel and stay updated with the latest tutorials on Selenium testing, automation testing, and more.
Here are some of the features LambdaTest offers to automate Android apps:
- Test native features of your mobile apps
- Automate Android apps on blazing fast test automation cloud – HyperExecute.
- Support for all languages & frameworks to automate Android apps.
- Comprehensive test execution logs
- Automate Android apps across different geolocations.
Setting up the Real Android Device
For this blog on how to automate Android apps using Appium, we use the LambdaTest cloud platform. On the LambdaTest App Automation Dashboard, navigate to Automation > App Automation on the left-hand panel.
Once on that page, click Browse File to upload the application. Check out the upload app page shown below:
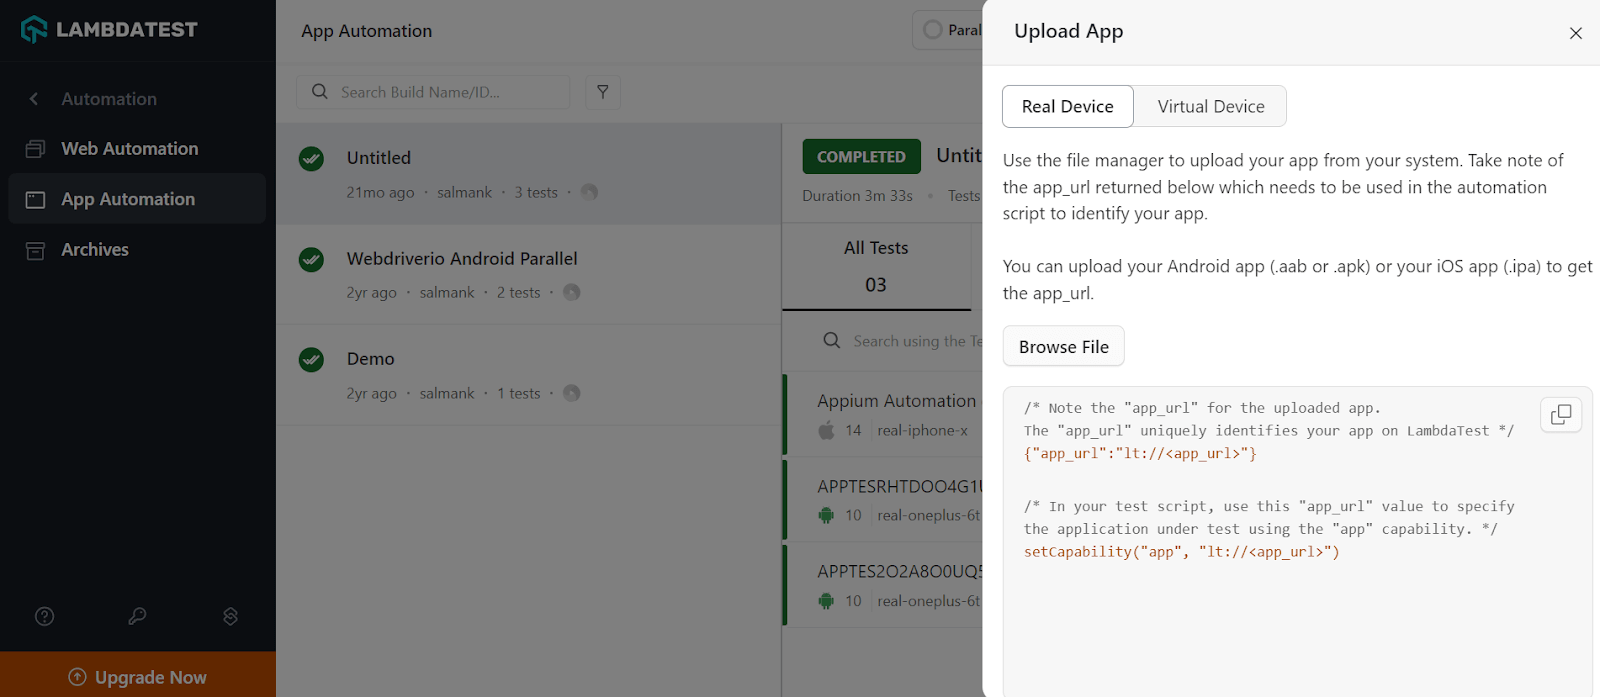
Once you upload the application, LambdaTest will return you with a unique application URL in the format lt://, which you must copy and keep safe as it will be required later when you inspect elements from the cloud or try running your Android test on the cloud.
Inspecting Elements on Real Android Device
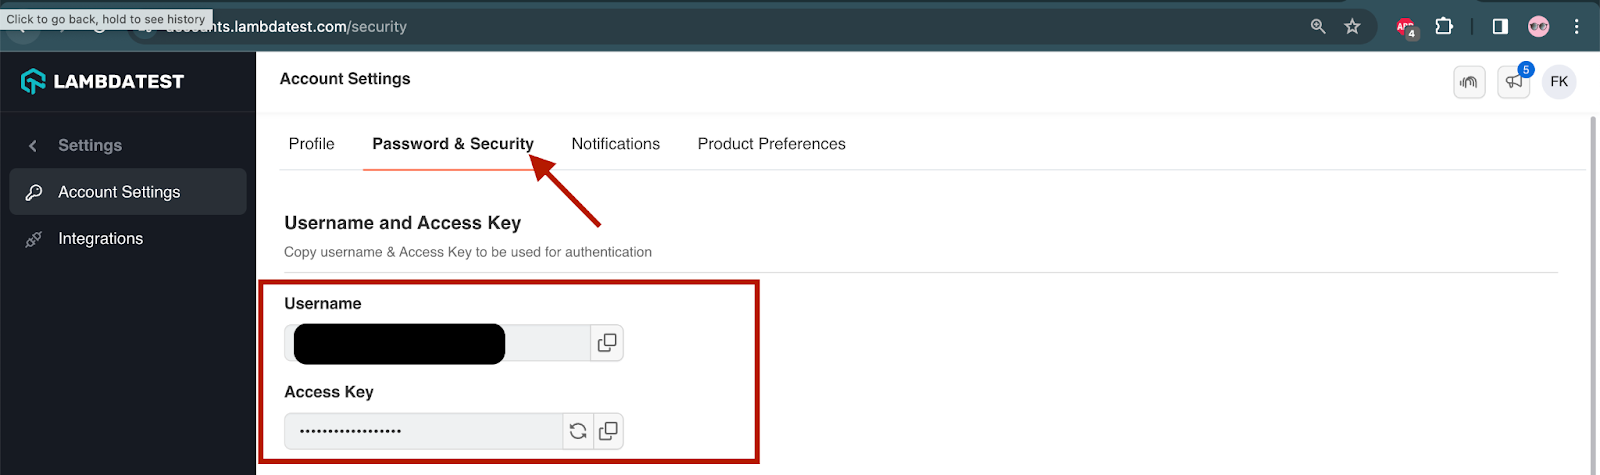
To inspect an element on a cloud device, you must get your LambdaTest credentials, which can be found on the Profile > Account Settings > Password & Security tab.

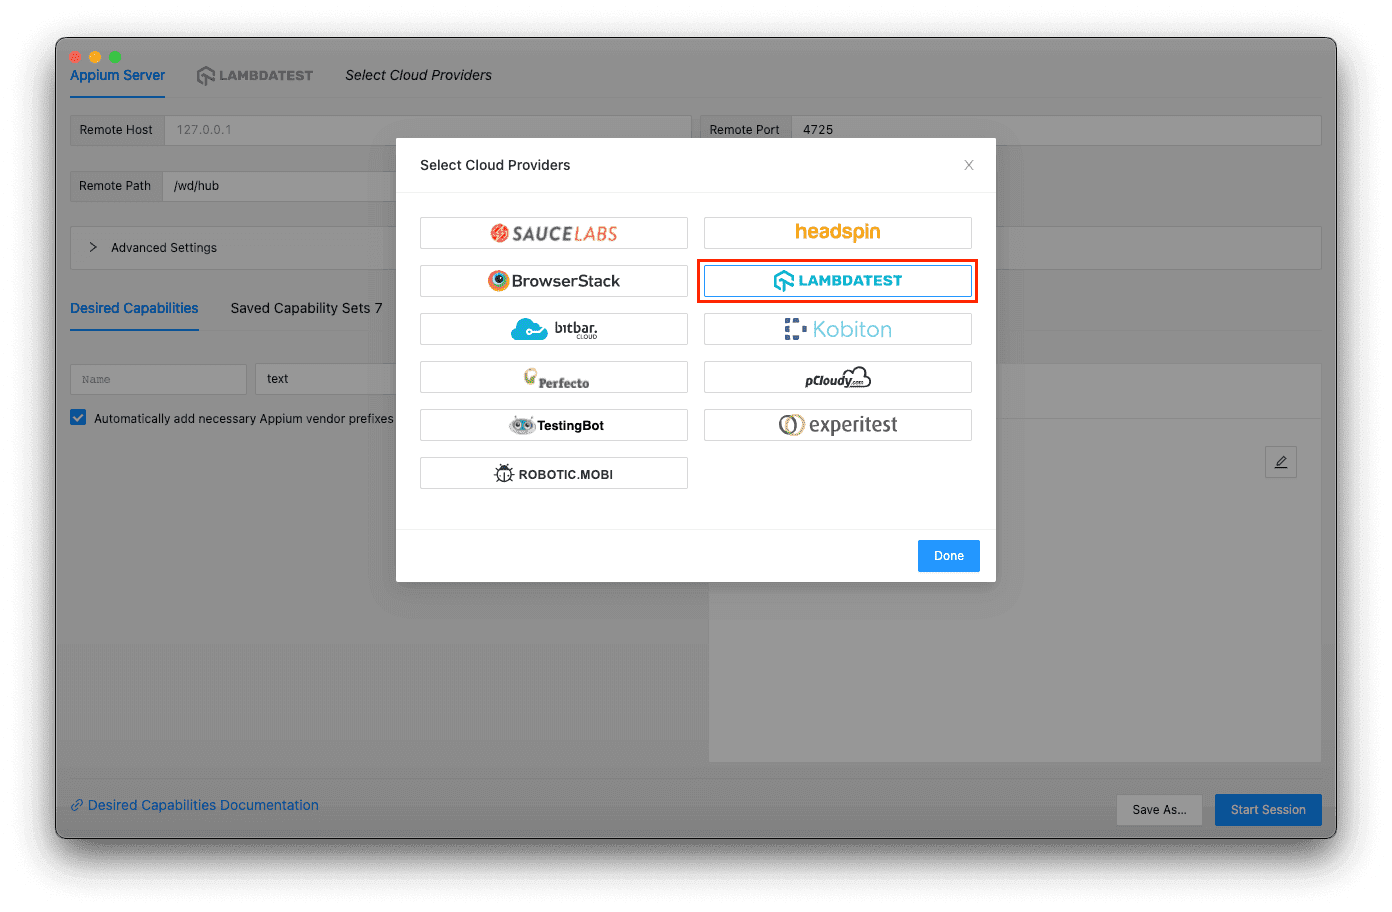
You can copy the Username and Access Key by clicking the copy icon. Now open the inspector window, click Select Cloud Providers, and select LambdaTest from the list of providers. Check out the screen below:
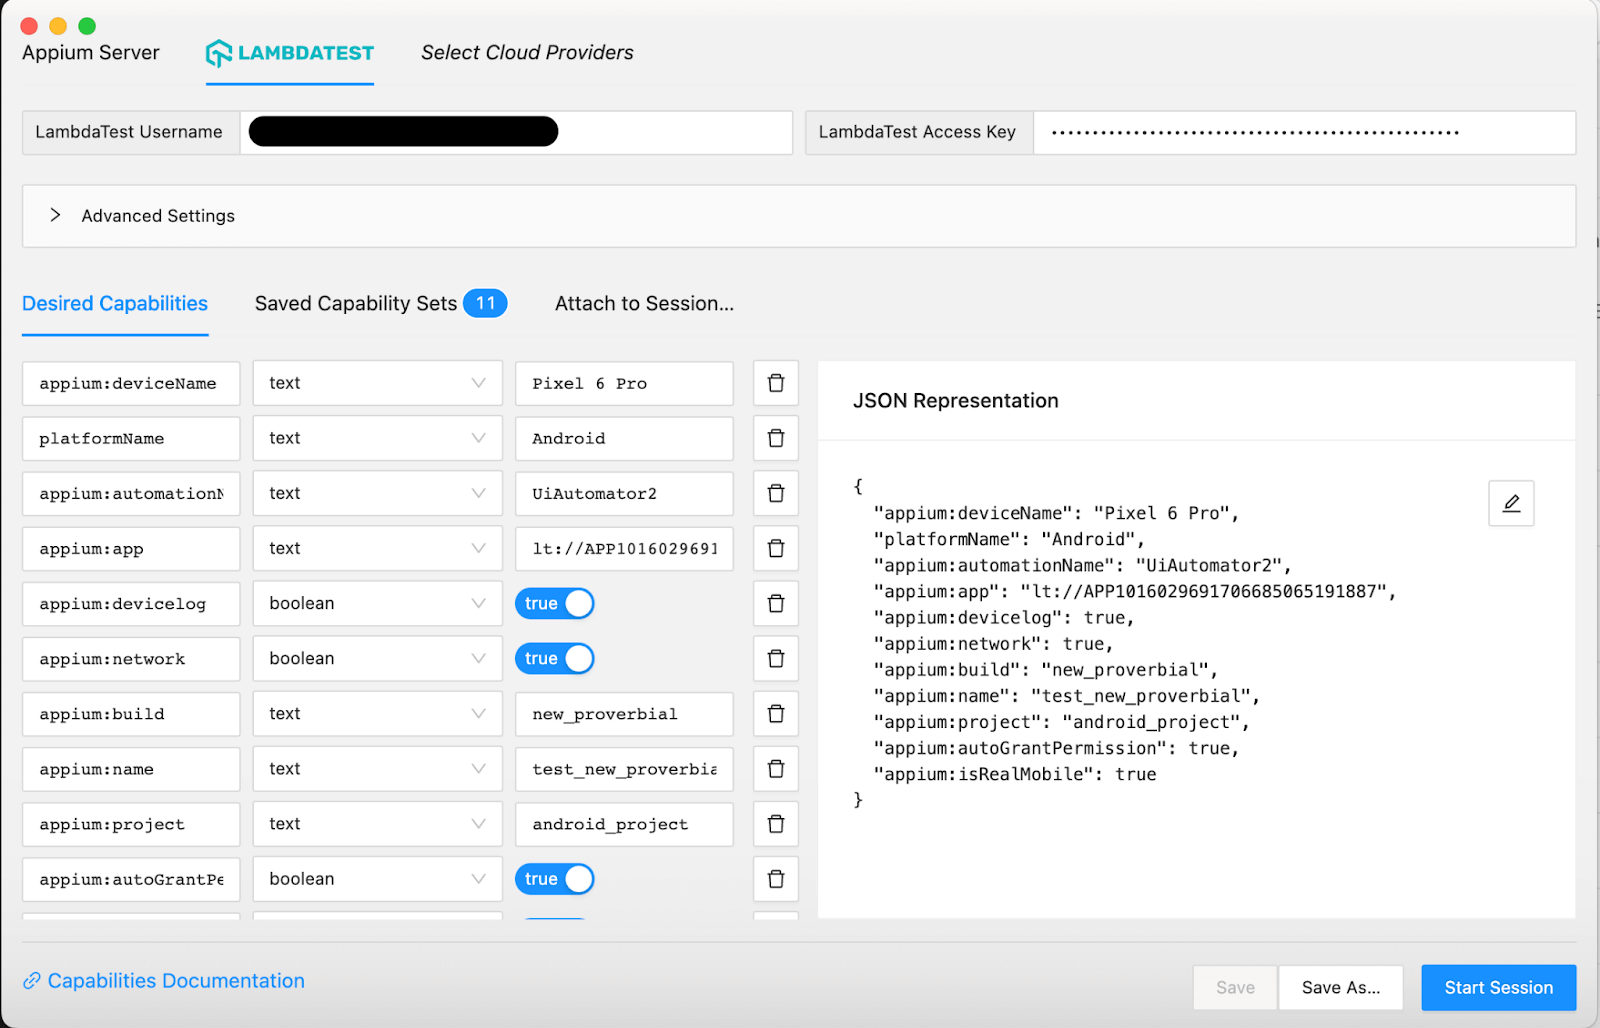
When you select the desired cloud provider, you can see it in the main window tabs. Select that tab and add the desired capabilities for starting the session on LambdaTest.
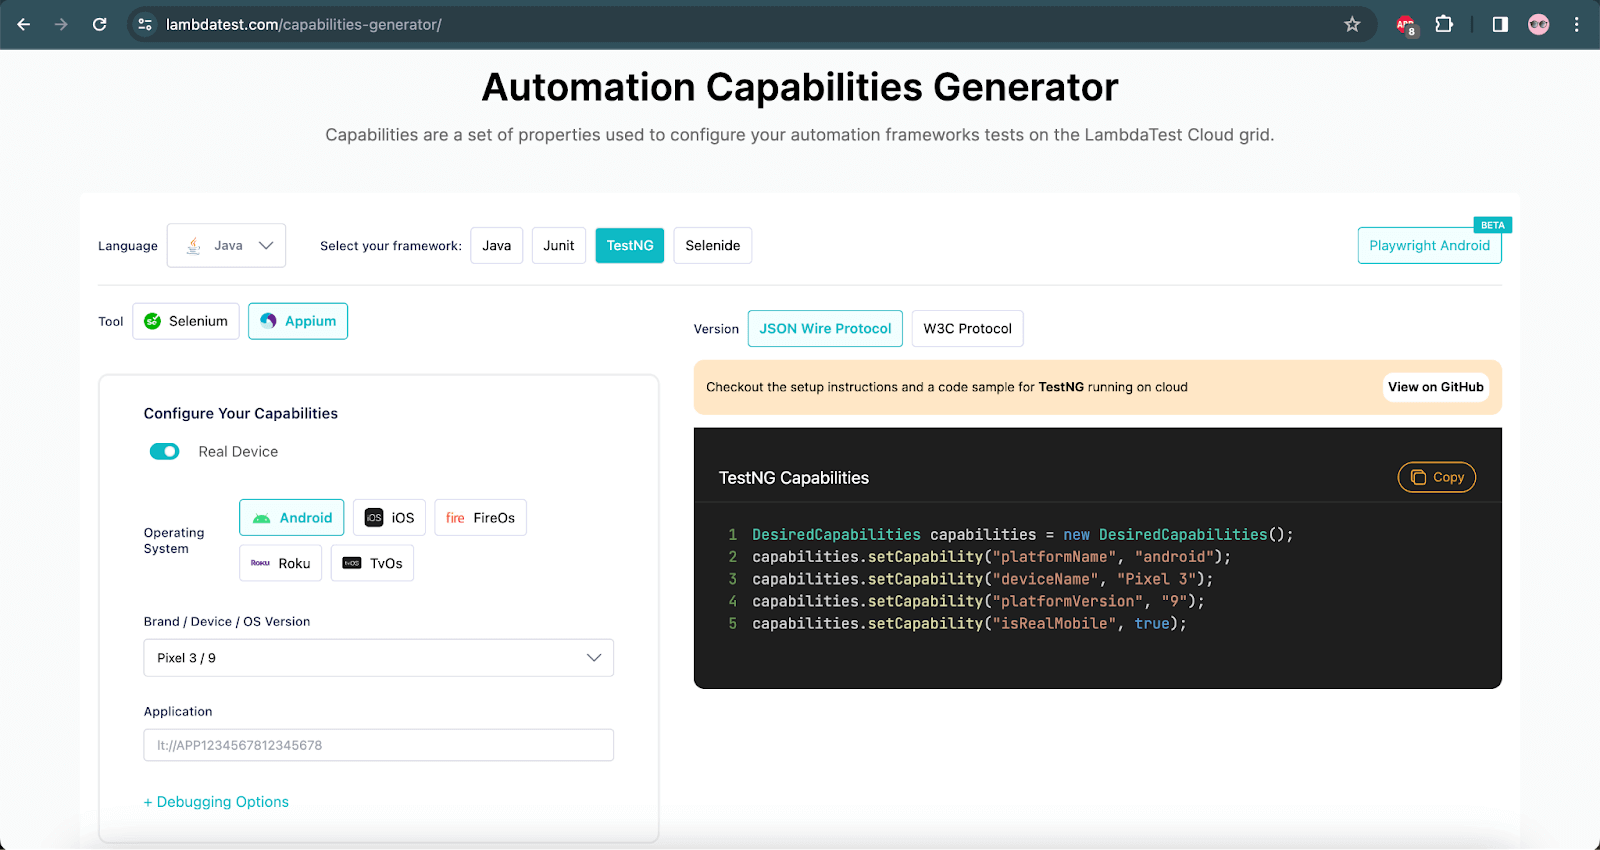
Let’s see the example in the next screenshot where I have selected LambdaTest and added all the desired capabilities along with additional LambdaTest-specific capabilities identified with the help of the LambdaTest Capabilities Generator.
Once everything looks good, click Start Session. The Appium Inspector application will establish a connection on LambdaTest. Once the session is started, you will see the inspector screen as follows:
Note: One thing to note here is, while setting the app capability in the inspector, is that I am passing the App URL provided by LambdaTest when the application was first uploaded on their servers.
You can confirm that the inspector session has started on LambdaTest by navigating to the LambdaTest App Automation Dashboard and clicking on Automation > App Automation. You will see that the build and session you provided in the capability in the inspector will be visible running on the dashboard. The same is shown in the screenshot below:
You can get more details about the session when you click on the session name.
Writing Appium Tests for Android App
Since you know how to inspect elements, the final step is to write an Appium test for an Android application. In this blog on how to automate Android apps using Appium, IntelliJ IDEA Community Edition is used. You can also use IntelliJ, but which IDE you prefer is up to you.
This tutorial on how to automate Android apps using Appium will cover the following test scenario.
- Use the Proverbial application provided by LambdaTest and test the hybrid page, which contains WebView, where we will enter a URL, navigate to that web page, and validate if we are on that page.
- Run the test on a local emulator.
- Run the test on LambdaTest, a cloud-based real Android device.

Feel free to clone the repository and follow along as I walk you through the repository in this blog.
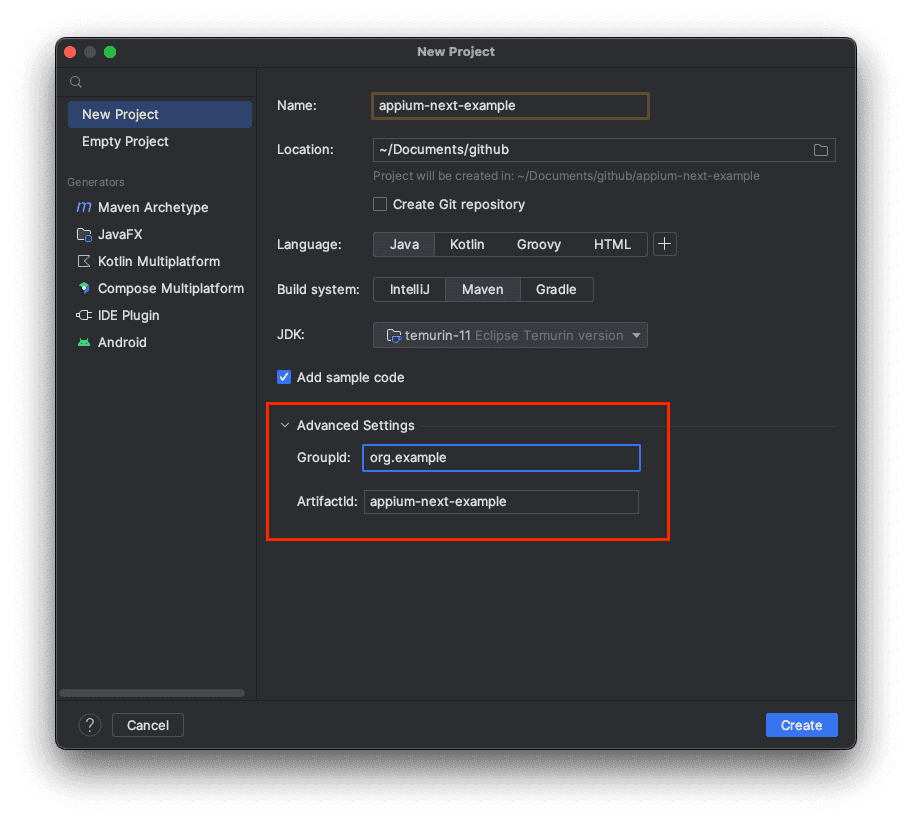
Create a Maven Project
Open IntelliJ IDEA and create a new project using Java 11 JDK and Maven. Make sure you have mentioned GroupId and ArtifactId in the Advanced Settings section, as shown below:
Add Dependencies
Once the project is created, open the pom.xml file and add the following dependencies.
|
1 2 3 4 5 6 7 8 9 10 11 12 13 14 15 16 17 18 19 20 21 22 23 24 25 26 27 28 29 30 |
. . . <dependencies> <!-- https://mvnrepository.com/artifact/io.appium/java-client --> <dependency> <groupId>io.appium</groupId> <artifactId>java-client</artifactId> <version>9.1.0</version> </dependency> <!-- https://mvnrepository.com/artifact/org.testng/testng --> <dependency> <groupId>org.testng</groupId> <artifactId>testng</artifactId> <version>7.9.0</version> <scope>test</scope> </dependency> <!-- https://mvnrepository.com/artifact/com.google.truth/truth --> <dependency> <groupId>com.google.truth</groupId> <artifactId>truth</artifactId> <version>1.3.0</version> <scope>test</scope> </dependency> <!-- https://mvnrepository.com/artifact/com.google.guava/guava --> <dependency> <groupId>com.google.guava</groupId> <artifactId>guava</artifactId> <version>31.1-jre</version> </dependency> </dependencies> . . . |
Let’s understand why we have used these dependencies:
- Appium Java client: This dependency is required to automate Android apps.
- TestNG: This dependency executes our tests on a local emulator and the cloud.
- Google Truth: This dependency is used to assert our test to ensure validation of our test.
- Guava: This is required for the Appium Java client to execute without issues. Without this dependency, the Java client gives an error while executing.
Start Appium Server Programmatically
When automating with Appium, it is essential to start the Appium Server from our test to control the test execution. To start an Appium Server programmatically, you must build the Appium service. Let’s see how to build the service:
|
1 2 3 4 5 6 7 8 9 10 11 12 13 14 15 16 17 18 19 |
private AppiumDriverLocalService buildAppiumService () { final var appiumPath = Path.of (System.getenv ("HOME"), ".nvm/versions/node/v16.19.0/lib/node_modules/appium/build/lib/main.js") .toFile (); final var logFile = Path.of (System.getProperty ("user.dir"), "logs", "appium.log") .toFile (); final var builder = new AppiumServiceBuilder (); return builder.withIPAddress (System.getProperty ("host", "127.0.0.1")) .usingPort (Integer.parseInt (System.getProperty ("port", "4723"))) .withLogFile (logFile) .withAppiumJS (appiumPath) .withArgument (GeneralServerFlag.BASEPATH, "/wd/hub") .withArgument (GeneralServerFlag.USE_DRIVERS, "uiautomator2") .withArgument (GeneralServerFlag.SESSION_OVERRIDE) .withArgument (GeneralServerFlag.ALLOW_INSECURE, "chromedriver_autodownload") .build (); } |
This method builds the AppiumServiceBuilder class instance with the required attributes per your machine. The attributes we set here are:
- host: We get the hostname from the system property. If it is not set, we will use host
127.0.0.1by default for localhost. - port: We set the port number from the system property. If it is not set, we will use port
4723, the default on which the Appium Server will start. - logFile: We are setting the log file name where the Appium Server will save all the server logs in this file.
- appiumPath: We are setting the Appium
main.jspath from its installation folder. Normally, when you install Node.js usingNVM, then when you install Appium, its path is under the .nvm directory. - BASEPATH: The base path for the server, which is normally
/wd/hub. - USE_DRIVERS: We set all the drivers we will use here. In this example, we will be using
uiautomator2. - Allow insecure: We will automate a WebView in a hybrid application in this example. So to automate the WebView, we must set the insecure flag
chromedriver_autodownloadto allow the Appium Server to automatically download the Chrome driver compatible with your device’s WebView.
To start the Appium Server, you need to call the start method as shown below:
|
1 2 |
this.service = buildAppiumService (); this.service.start (); |
To stop the Appium Server, you must call the stop method like:
|
1 2 3 |
if (this.service != null) { this.service.stop (); } |
Start the Session on Local Emulator
Now your Appium Server is ready to start and accept sessions and connect your tests with the running device. To start the session, you must first create a set of capabilities describing your test device and the application under test. Let’s see how to achieve this in the following code snippet:
|
1 2 3 4 5 6 7 8 9 10 11 12 13 14 15 16 17 18 |
private static final String DEVICE_NAME_KEY = "deviceName"; private static final String DEVICE_VERSION_KEY = "deviceVersion"; . . . private Capabilities buildCapabilities () { final var deviceName = System.getProperty (DEVICE_NAME_KEY, "Pixel_6_Pro"); final var deviceVersion = System.getProperty (DEVICE_VERSION_KEY, "11"); final var options = new UiAutomator2Options (); options.setPlatformName ("Android") .setPlatformVersion (deviceVersion) .setDeviceName (deviceName) .setAvd (deviceName) .setApp (Path.of (System.getProperty ("user.dir"), "src/test/resources/proverbial.apk") .toString ()) .setAutoGrantPermissions (true) .setIsHeadless (Boolean.parseBoolean (System.getProperty ("headless", "false"))); return options; } . . . |
From Appium Java client v8, you can now use the UiAutomator2Options class instance to build the capabilities. In this example, we set:
- PlatformName: This is set as
Androidas we automate Android apps. - PlatformVersion: This is to set the Android version passed from the system property or use
11by default if the property is not set. - deviceName: To set the Android device name, which will be passed from the system property, or use
Pixel_6_Proby default. You must ensure that you pass the device name via system property as it may fail if not passed because you may not have the emulator with the default name. - Avd: This is the same as the device name. When this capability is set with the correct emulator name, Appium will launch the emulator if it has not started.
- App Path: This is set as the application
APKfile path from your machine. - AutoGrantPermissions: This is set to
trueby default, allowing all the permissions required by the application under test. - IsHeadless: This is set as the boolean value passed using system property to determine whether to run on the emulator in a headless mode. If set to
true, the emulator UI will not be visible, and the emulator will run in the background. However, if the emulator is already running and visible, this flag value will not be considered.
To start the session on the Appium Server, you must pass these capabilities to the AndroidDriver instance along with the server URL. Let’s see how to achieve this:
|
1 2 3 4 |
final Capabilities capabilities = buildCapabilities (); final URL serverUrl = this.service.getUrl (); this.driver = new AndroidDriver (serverUrl, capabilities); this.driver.setSetting (Setting.IGNORE_UNIMPORTANT_VIEWS, true); |
You can get the server URL using the service instance we created earlier and pass the capabilities we built to the AndroidDriver instance a while ago. This will establish the connection between the Appium Server and the device. If not started already, it will launch the emulator and install and start the application under test on the device.
Pro Tip: We update the driver settings to set IGNORE_UNIMPORTANT_VIEWS as true. This will clean up the hierarchy of the elements displayed on the screen. You will only see those elements that are visible in the hierarchy. This will speed up the process of finding the elements later on.
To disconnect the session with the Appium Server, you must call the quit method from the driver instance as shown below:
|
1 |
this.driver.quit (); |
Start the Session on the Cloud-Based Real Android Device
We will run our tests on LambdaTest cloud-based real Android devices. For this, you must first set a few environment variables on your machine for the test setup. Those environment variables can be set by adding the following lines in your .zshrc or .bash_profile file if you are on macOS or an equivalent file on Linux or by manually adding them to the Windows environment variables.
|
1 2 3 |
export LT_USERNAME="your-user-name" export LT_ACCESS_KEY="your-access-key" export LT_APP_ANDROID="your-app-url" |
Once these are set, now let’s see how to set up the cloud capabilities below:
|
1 2 3 4 5 6 7 8 9 10 11 12 13 14 15 16 17 18 19 20 21 22 23 24 25 26 27 28 29 30 31 32 33 34 35 36 37 38 |
private static final String DEVICE_NAME_KEY = "deviceName"; private static final String DEVICE_VERSION_KEY = "deviceVersion"; . . . private URL getCloudUrl () { final var cloudUrl = "https://{0}:{1}@mobile-hub.lambdatest.com/wd/hub"; final var userName = Objects.requireNonNull (System.getenv ("LT_USERNAME"), "Cloud user name is required"); final var key = Objects.requireNonNull (System.getenv ("LT_ACCESS_KEY"), "Cloud access key is required"); final var path = MessageFormat.format (cloudUrl, userName, key); try { return new URL (path); } catch (final MalformedURLException e) { throw new UnsupportedOperationException (format ("URL malformed: {0}", path)); } } . . . private Capabilities buildCloudCapabilities () { final var deviceName = System.getProperty (DEVICE_NAME_KEY, "Pixel_6_Pro"); final var deviceVersion = System.getProperty (DEVICE_VERSION_KEY, "11"); final var options = new UiAutomator2Options (); final var ltOptions = new HashMap<> (); ltOptions.put ("w3c", true); ltOptions.put ("platformName", "Android"); ltOptions.put (DEVICE_NAME_KEY, deviceName); ltOptions.put ("platformVersion", deviceVersion); ltOptions.put ("app", Objects.requireNonNull (System.getenv ("LT_APP_ANDROID"), "Cloud App URL is required")); ltOptions.put ("devicelog", true); ltOptions.put ("visual", true); ltOptions.put ("network", true); ltOptions.put ("video", true); ltOptions.put ("build", "Appium sample Build"); ltOptions.put ("name", "Android Sample"); ltOptions.put ("project", "Appium Sample Project"); ltOptions.put ("autoGrantPermissions", true); ltOptions.put ("isRealMobile", true); options.setCapability ("lt:options", ltOptions); return options; } . . . |
Let’s break down this code snippet. First, we are building the cloud platform URL by concatenating our cloud user name and access key in the URL itself. Secondly, we have created the capabilities specific to the LambdaTest cloud and saved it as a Map, which is later passed on to the UiAutomator2Options instance class.
To know what capabilities LambdaTest supports, refer to the LambdaTest Capabilities Generator and play around to see what capabilities you want. The best thing about this is that it also generates a Java code snippet, which you can refer to when writing your tests.
Next, we need the LambdaTest Username and Access Key. These values can be fetched by logging in to the LambdaTest website and navigating to Profile > Account Settings > Password & Security tab, as shown in the screenshot below.

To connect your test to run on the cloud device, you need to pass the cloud URL and the capabilities we built in the previous step to the AndroidDriver instance, as shown below:
|
1 2 3 |
URL serverUrl = getCloudUrl (); Capabilities capabilities = buildCloudCapabilities (); this.driver = new AndroidDriver (serverUrl, capabilities); |
To stop the cloud session, you must call the quit method as demonstrated before for running on a local emulator.
Create Page Objects
Next step is creating a page object. Since we are looking into a hybrid screen in the proverbial application used in this blog on how to automate Android apps using Appium, we will have this minimal page object just to understand the basic interaction Appium allows us to do.
|
1 2 3 4 5 6 7 8 9 10 11 12 13 14 15 16 17 18 19 20 21 22 23 24 25 26 27 28 29 30 31 32 33 34 35 36 37 38 39 40 41 42 43 |
import static org.openqa.selenium.support.ui.ExpectedConditions.visibilityOfElementLocated; import io.appium.java_client.AppiumBy; import io.appium.java_client.android.AndroidDriver; import org.openqa.selenium.By; import org.openqa.selenium.WebElement; import org.openqa.selenium.support.ui.WebDriverWait; public class HybridPage { private final AndroidDriver driver; private final WebDriverWait wait; public HybridPage (final AndroidDriver driver, final WebDriverWait wait) { this.driver = driver; this.wait = wait; } public WebElement browserTab () { return this.wait.until (visibilityOfElementLocated (AppiumBy.accessibilityId ("Browser"))); } public void navigateTo (final String url) { browserTab ().click (); url ().sendKeys (url); this.driver.hideKeyboard (); find ().click (); } public String webTitle () { return this.wait.until (visibilityOfElementLocated (By.tagName ("h1"))) .getText (); } private WebElement find () { return this.wait.until (visibilityOfElementLocated (AppiumBy.id ("find"))); } private WebElement url () { return this.wait.until (visibilityOfElementLocated (AppiumBy.id ("url"))); } } |
So, on the test screen, we click on the Browser tab to navigate to the hybrid screen of the application. It contains a text box where the user will enter the website address, which you want to navigate using the sendKeys() method. Then click the Find button using the click method, which will load that website in the web view component below on that same screen.
In this page object, we have a method for all the elements we will interact with in the complete flow of the tests, which we will cover in the next section. We also have the navigateTo method, which will be called from the test with the intended URL passed as the parameter.
We also have a method called webTitle, which is nothing but the h1 tag of the website we will be visiting in our test, where we will assert the text of this title element by getting the text of the element using the getText method.
Write Test Classes
Let’s put everything together in our test class. Following is the test class content:
|
1 2 3 4 5 6 7 8 9 10 11 12 13 14 15 16 17 18 19 20 21 22 23 24 25 26 27 28 29 30 31 32 33 34 35 36 37 38 39 40 41 42 43 44 45 46 47 48 49 50 51 52 53 54 55 |
import static com.google.common.truth.Truth.assertThat; import java.time.Duration; import com.github.wasiqb.pages.HybridPage; import io.appium.java_client.android.AndroidDriver; import org.openqa.selenium.support.ui.WebDriverWait; import org.testng.annotations.AfterTest; import org.testng.annotations.BeforeTest; import org.testng.annotations.Parameters; import org.testng.annotations.Test; public class AndroidTest { private AndroidDriver driver; private DriverManager driverManager; @Parameters ("isCloud") @BeforeTest (alwaysRun = true) public void setupTest (final boolean isCloud) { this.driverManager = DriverManager.createDriver (isCloud); this.driver = this.driverManager.getDriver (); } @AfterTest (alwaysRun = true) public void teardownTest () { this.driverManager.close (); } @Test public void testHybridScreen () { final var wait = new WebDriverWait (this.driver, Duration.ofSeconds (5)); final var hybridPage = new HybridPage (this.driver, wait); hybridPage.navigateTo ("https://www.lambdatest.com"); wait.until (d -> this.driver.getContextHandles () .size () > 1); this.driver.context ("WEBVIEW_com.lambdatest.proverbial"); assertThat (hybridPage.webTitle ()).isEqualTo ("Cross Browser\nTesting Cloud"); this.driver.context ("NATIVE_APP"); assertThat (hybridPage.browserTab () .isEnabled ()).isTrue (); } } |
First, in this test class, we have a setup method, where we initialize the driverManager class and specify where we intend to run the test on. If we want to run on a local emulator, we pass false in the parameter of the createDriver method, and when we want to run on the cloud instance, we pass true.
Next, we have a teardown method where we close the driver session, which internally quits the driver and closes the Appium Server on a local emulator.
Next, in our test method, we initialize the HybridPage
instance, where we navigate to the Browser tab, enter the URL https://www.lambdatest.com and click on the Find button. Later we verify the web page title to verify that the page is loaded correctly.
One thing to note is the context method, which tells Appium to switch its context from the native to the WebView so we can find the elements from the web page visible in the WebView on that screen.
You can get all the available contexts on the screen using the getContextHandles method, which will return the context names. You can use this name to switch the driver context according to your requirements.
In the next section, we will be demonstrating how to automate Android apps using Appium.
Demo: How to Automate Android Apps Using Appium
Before you run the test, you must create the testng.xml file. The file should be added to the root folder of the project. This file will help in executing the tests in an organized way. It also helps in easy maintenance and readability of the test execution.
In our case, we will create two files, one for local execution called testng-local.xml and another for testng-cloud.xml for executing on the cloud platform.
Let’s check out one of the files to understand how to set up TestNG to run our test:
|
1 2 3 4 5 6 7 8 9 |
<!DOCTYPE suite SYSTEM "https://testng.org/testng-1.0.dtd"> <suite name="Appium Android Suite" verbose="2"> <test name="Appium Android Local Test"> <parameter name="isCloud" value="false" /> <classes> <class name="com.github.wasiqb.AndroidTest" /> </classes> </test> </suite> |
This file is for running on a local emulator. In the other file, we will have the value of the isCloud parameter to true.
Running Tests on CLI Using Maven
To run our tests using the Maven command line, we must first tell Maven what TestNG file needs to be executed and all the required system properties. For this, you must update your pom.xml file with the following build block as shown below:
|
1 2 3 4 5 6 7 8 9 10 11 12 13 14 15 16 17 18 19 20 21 22 23 24 25 26 27 28 29 30 31 32 33 34 35 |
<properties> . . . <argLine>-Dfile.encoding=UTF-8 -Xdebug -Xnoagent</argLine> <target>local</target> </properties> . . . <build> <plugins> <plugin> <groupId>org.apache.maven.plugins</groupId> <artifactId>maven-surefire-plugin</artifactId> <version>3.1.0</version> <executions> <execution> <goals> <goal>test</goal> </goals> </execution> </executions> <configuration> <useSystemClassLoader>false</useSystemClassLoader> <properties> <property> <name>usedefaultlisteners</name> <value>false</value> </property> </properties> <suiteXmlFiles> <suiteXmlFile>testng-${target}.xml</suiteXmlFile> </suiteXmlFiles> <argLine>${argLine}</argLine> </configuration> </plugin> </plugins> </build> |
Here we use the maven-surefire-plugin , and we specify the testng.xml file using the suiteXmlFile property. We are using the target property to differentiate which TestNG file to run, and we have declared the target property in the properties block with the default value as local. This means that if you don’t pass the system property of the target, the local target will be used by default, and the local test will be executed.
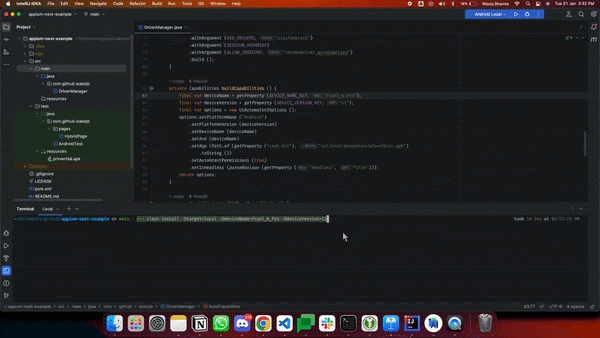
Once this is setup, you can run the following command to run on the local emulator:
|
1 2 |
> mvn clean install -Dtarget=local -DdeviceName=<emulator_name> -DdeviceVersion=<emulator_version> |
And run the following command to run on the cloud device:
|
1 2 |
> mvn clean install -Dtarget=cloud -DdeviceName=<emulator_name> -DdeviceVersion=<emulator_version> |
Check out the execution of tests using the command mentioned above:
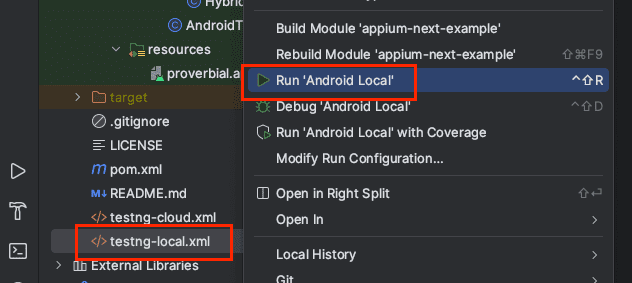
Running Tests on IDE
Now, to run our test on the IDE, you can simply right-click on the testng.xml file and click on the Run option as shown below:
When the test runs for the first time, it will fail because you have not yet set the system properties and specify the deviceName and deviceVersion. Let’s see how to update the system properties in the IDE.
You can edit the run configuration created when running the test by clicking the Edit Configurations option, as shown below.
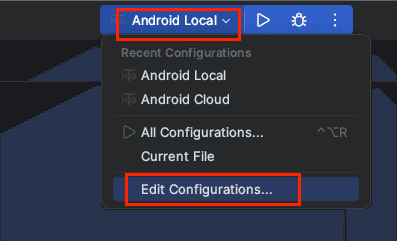
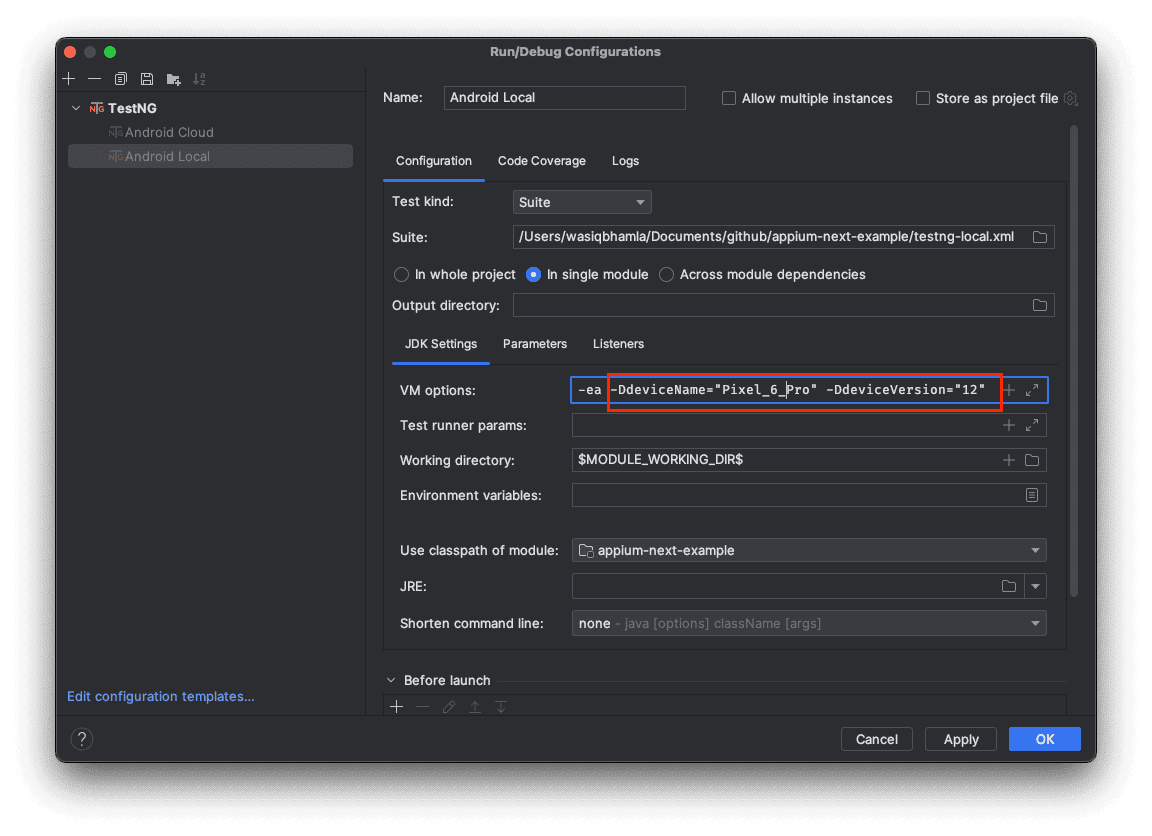
This will open the configuration window, where you can mention the system properties required by your test. You can specify the system properties in the field as shown in below screenshot:
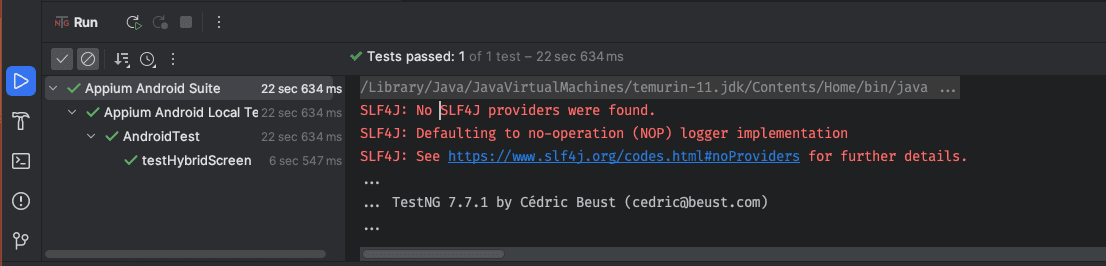
Once everything looks good, you can click Apply and OK to save the configurations and then click the (▶️) button next to the run configuration you saved. This will execute the tests in your IDE. You will be able to see the run results in the corresponding panel in the IDE as shown below:
Reporting of the Test Result on LambdaTest
When your run is started on the cloud device, you will be able to see the real-time test execution video streaming and steps being executed on the device from your tests on the LambdaTest App Automation Dashboard. To navigate your test:
Log in to the dashboard and click Real Device > App Automation on the left-hand side navigation panel. You will see the below screen:
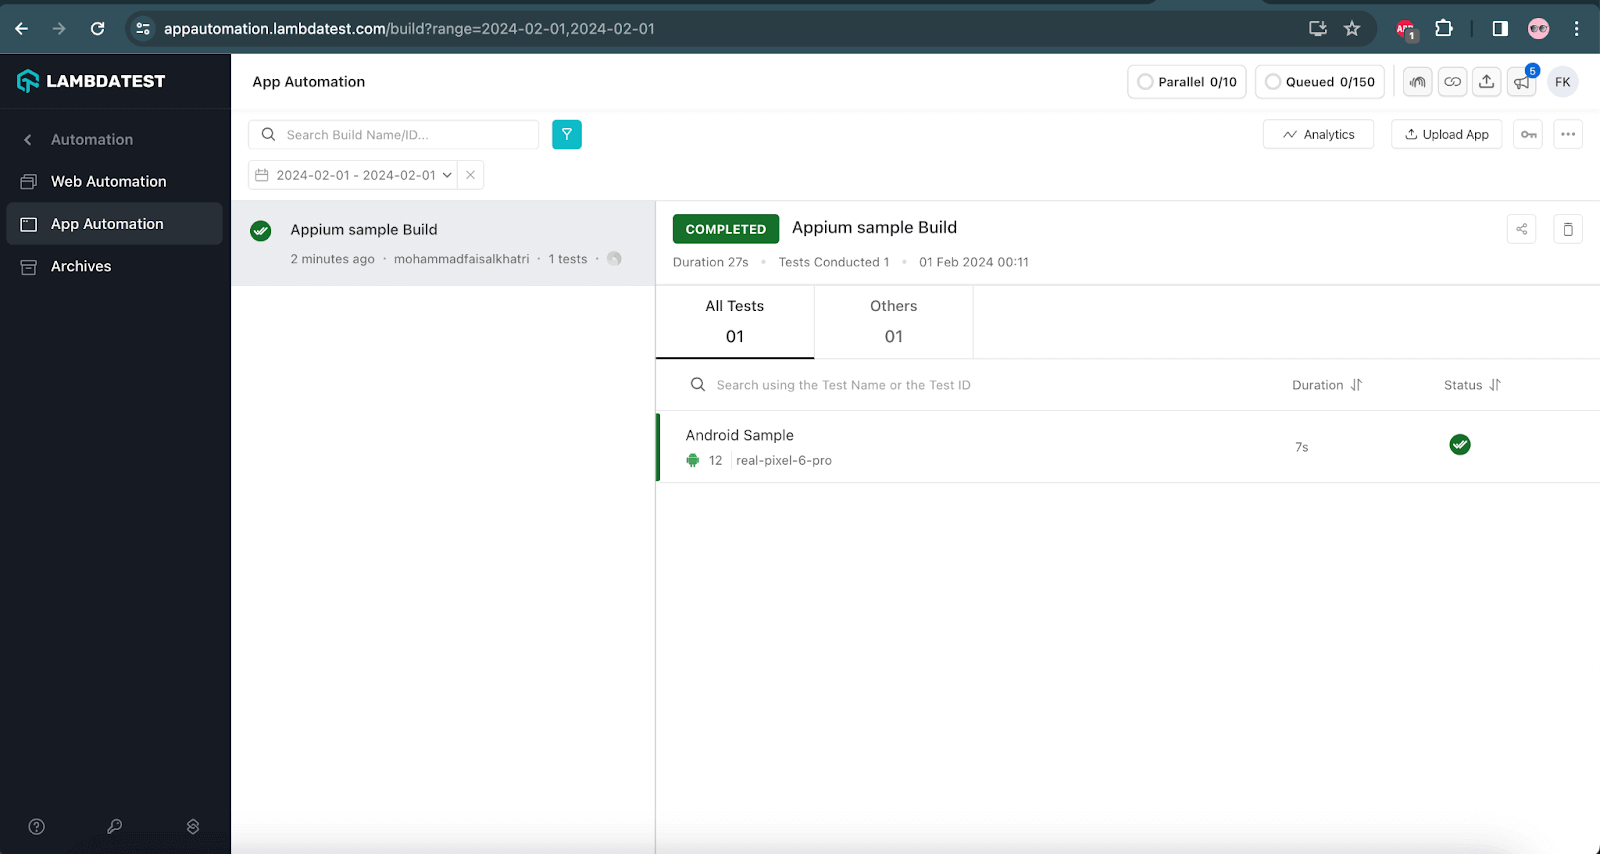
On this screen, you will see all the test executions you have ever run. To reduce the clutter, you can filter the records based on the project name you mentioned in the cloud capabilities while executing the tests. Once the filter is applied, you will see only those tests which are a part of that project.
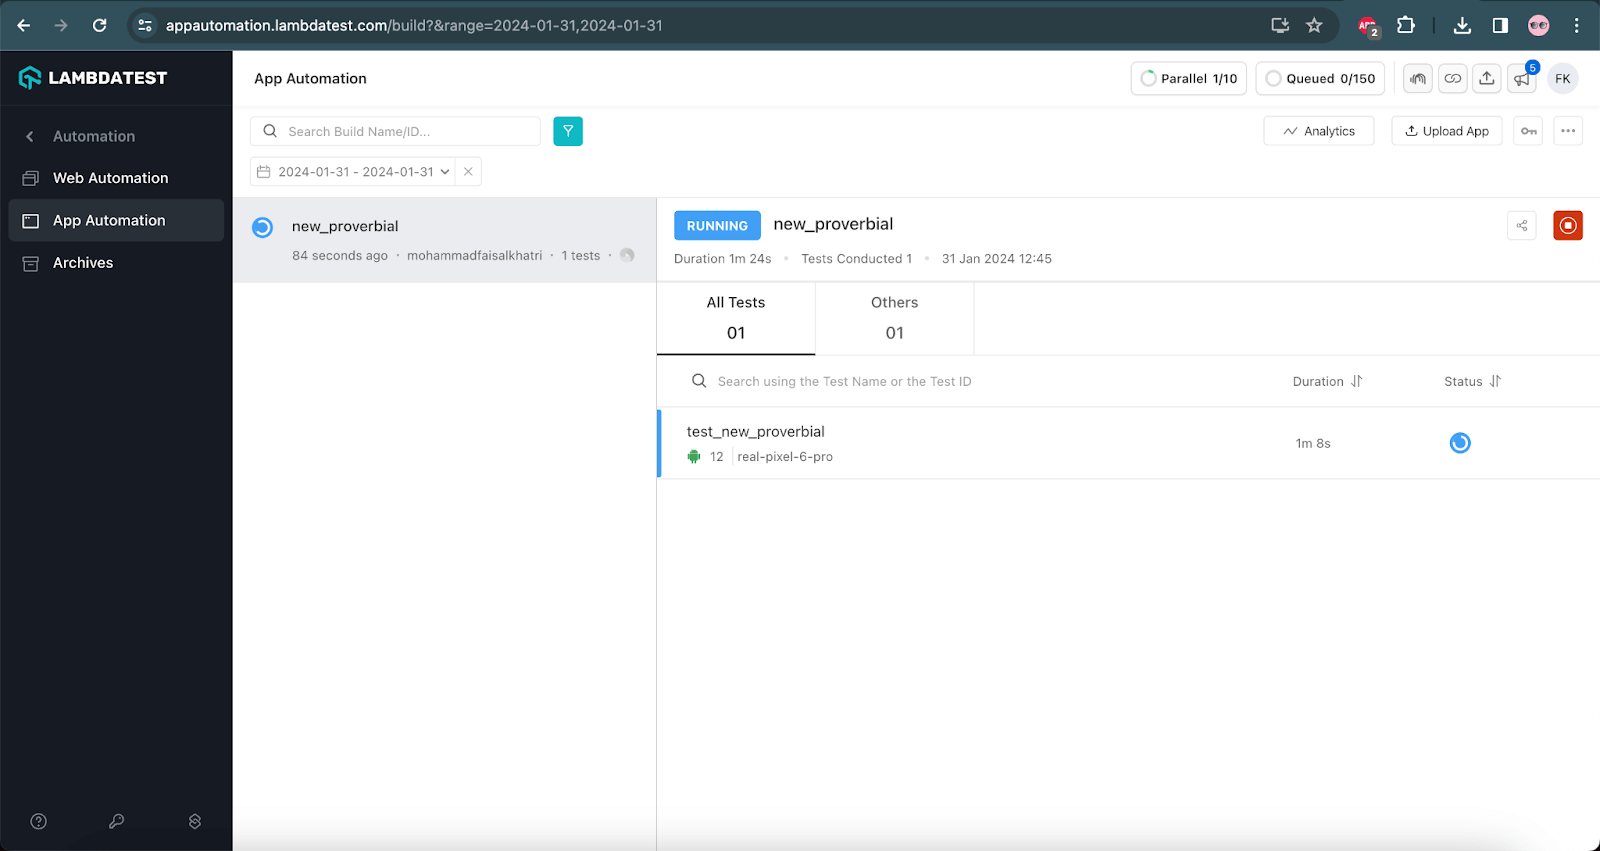
When a test runs, you will see it running in the right section of this screen with the status RUNNING. When you click it, you will be able to see all the real-time interactions of the test.
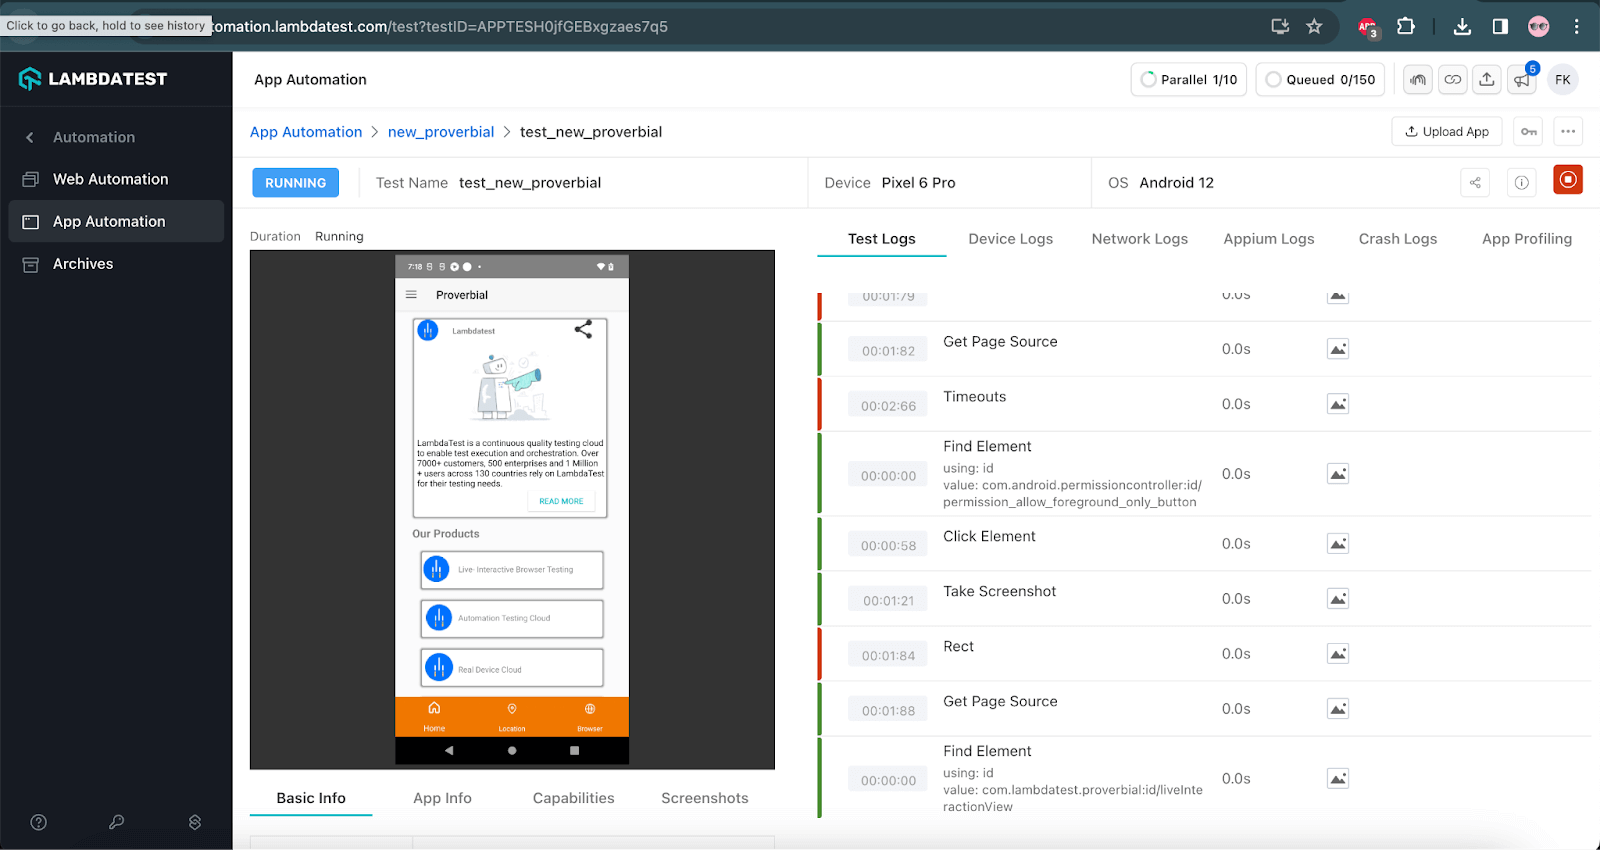
Once the test execution is completed, you can see loads of details about the test when you click and open the test from the right section. This is what you will see first when you open the test session:
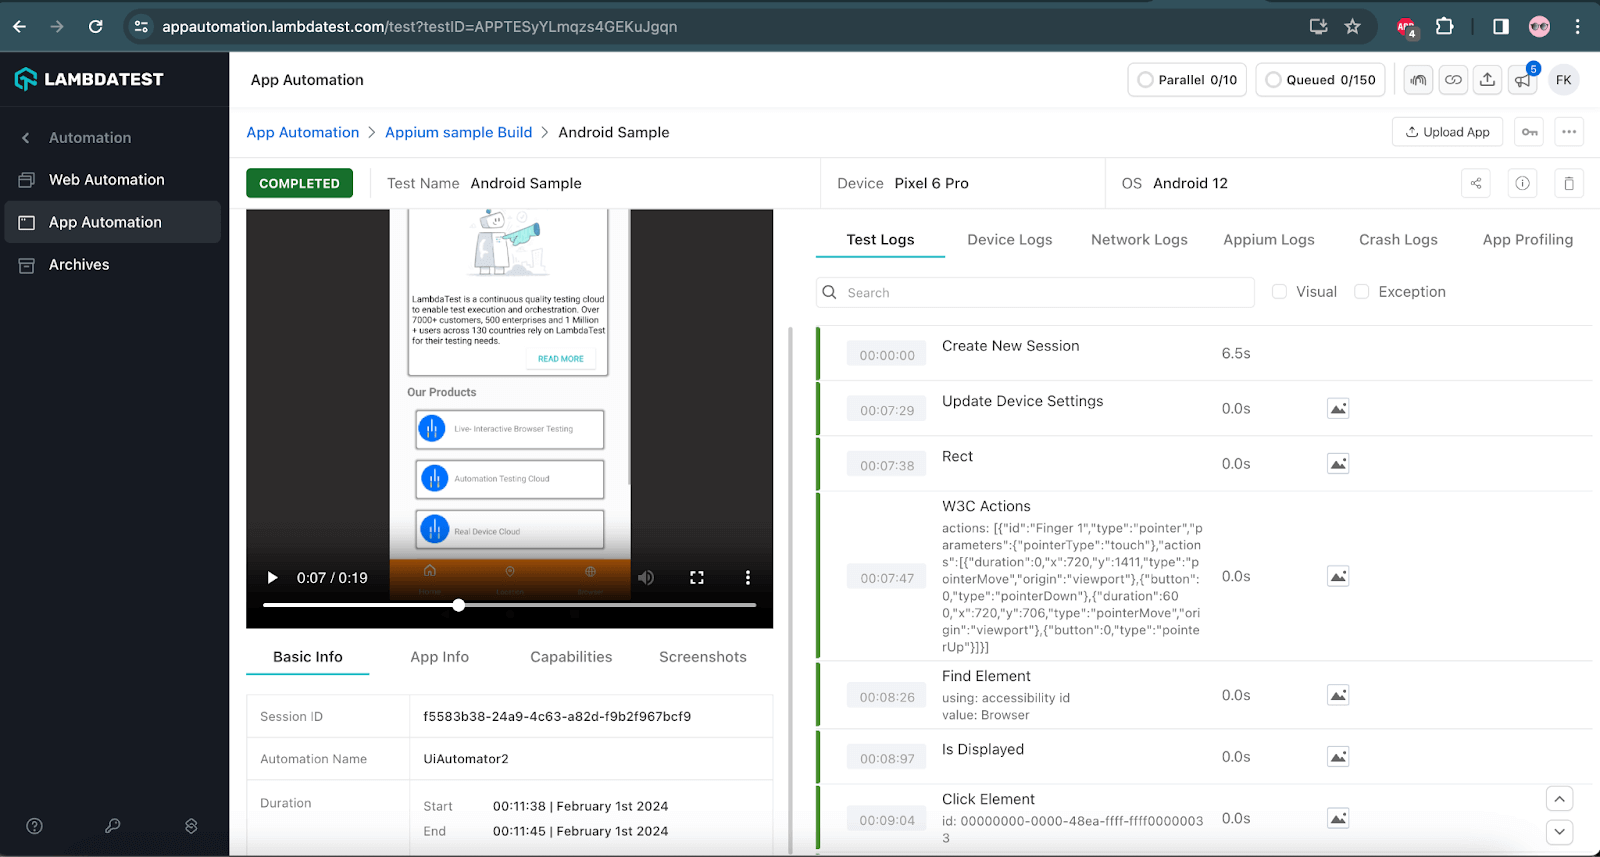
On this screen, you will see the video of the tests, all the test steps that were executed, and the time it took to run that step, along with the screenshots at the time of executing that step.
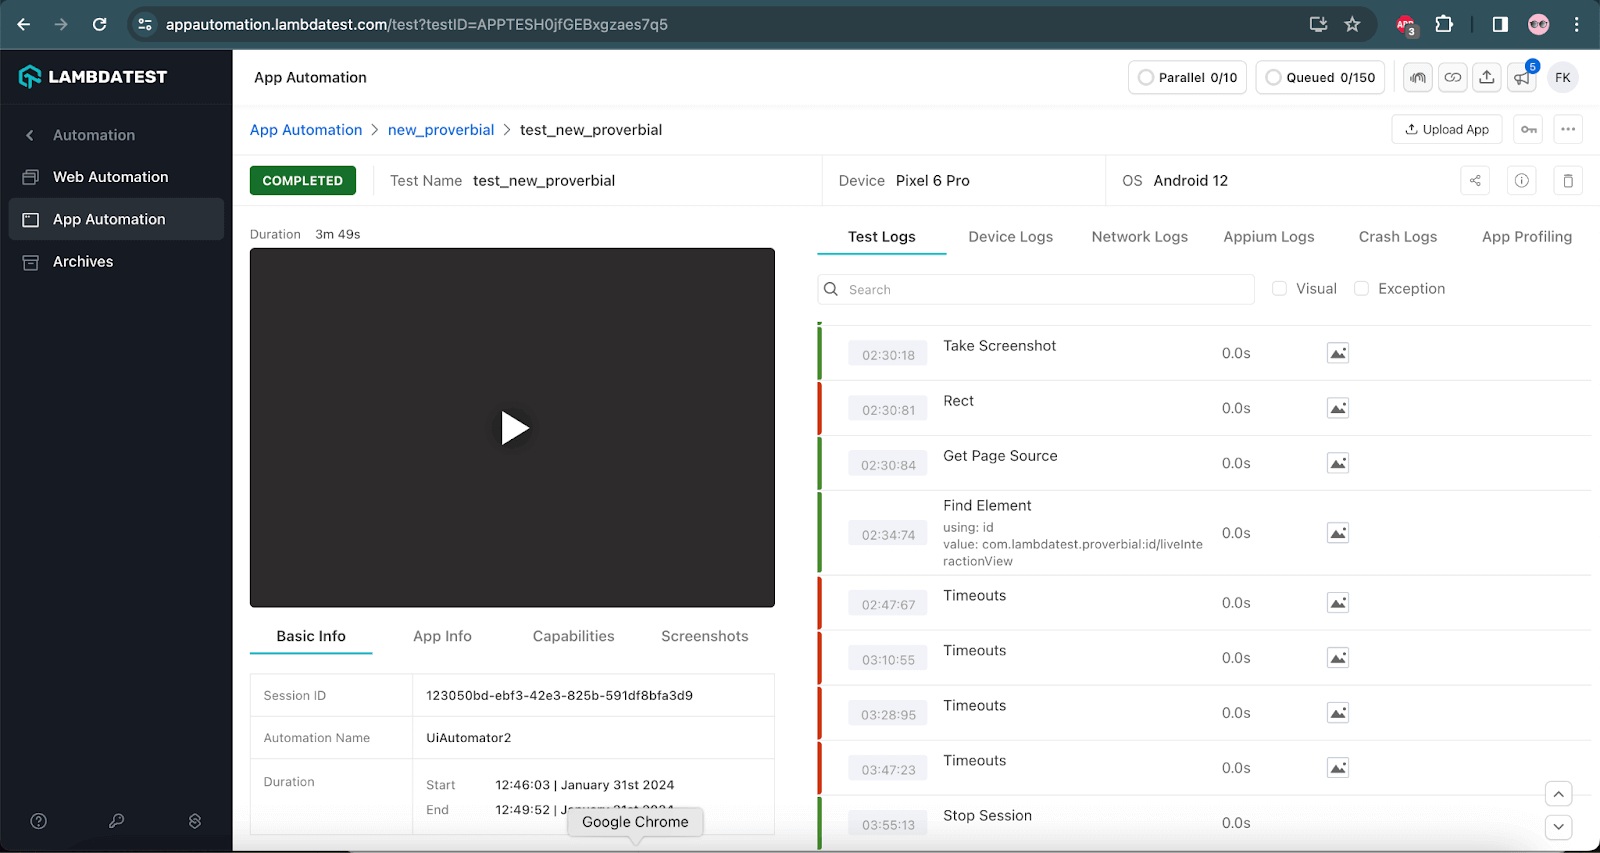
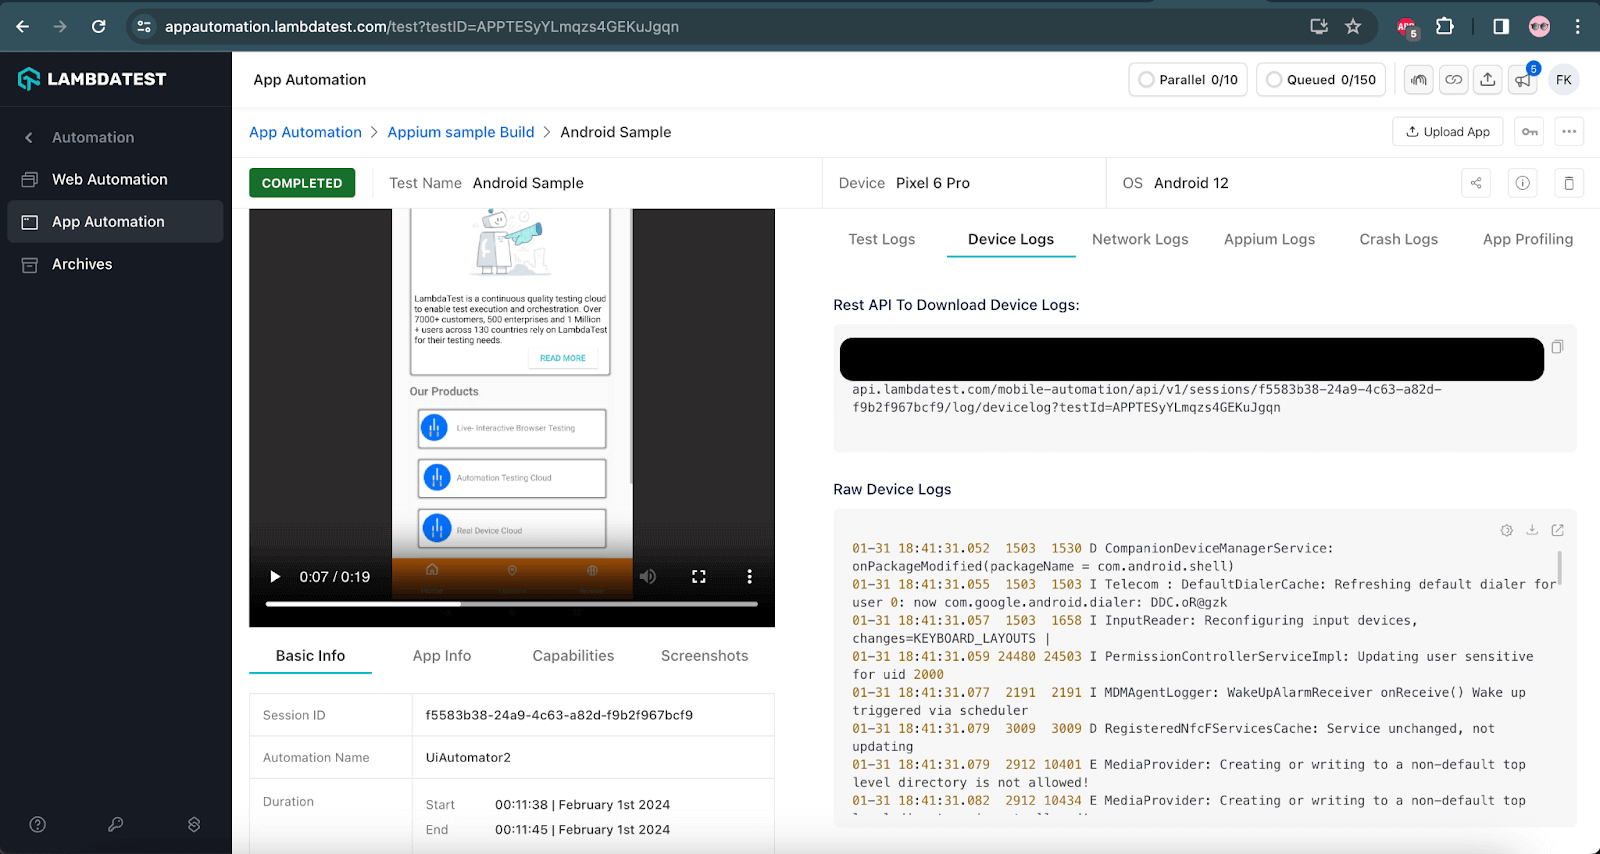
You can also see the device logs of the executed test when you click on the Device Logs tab as shown below:
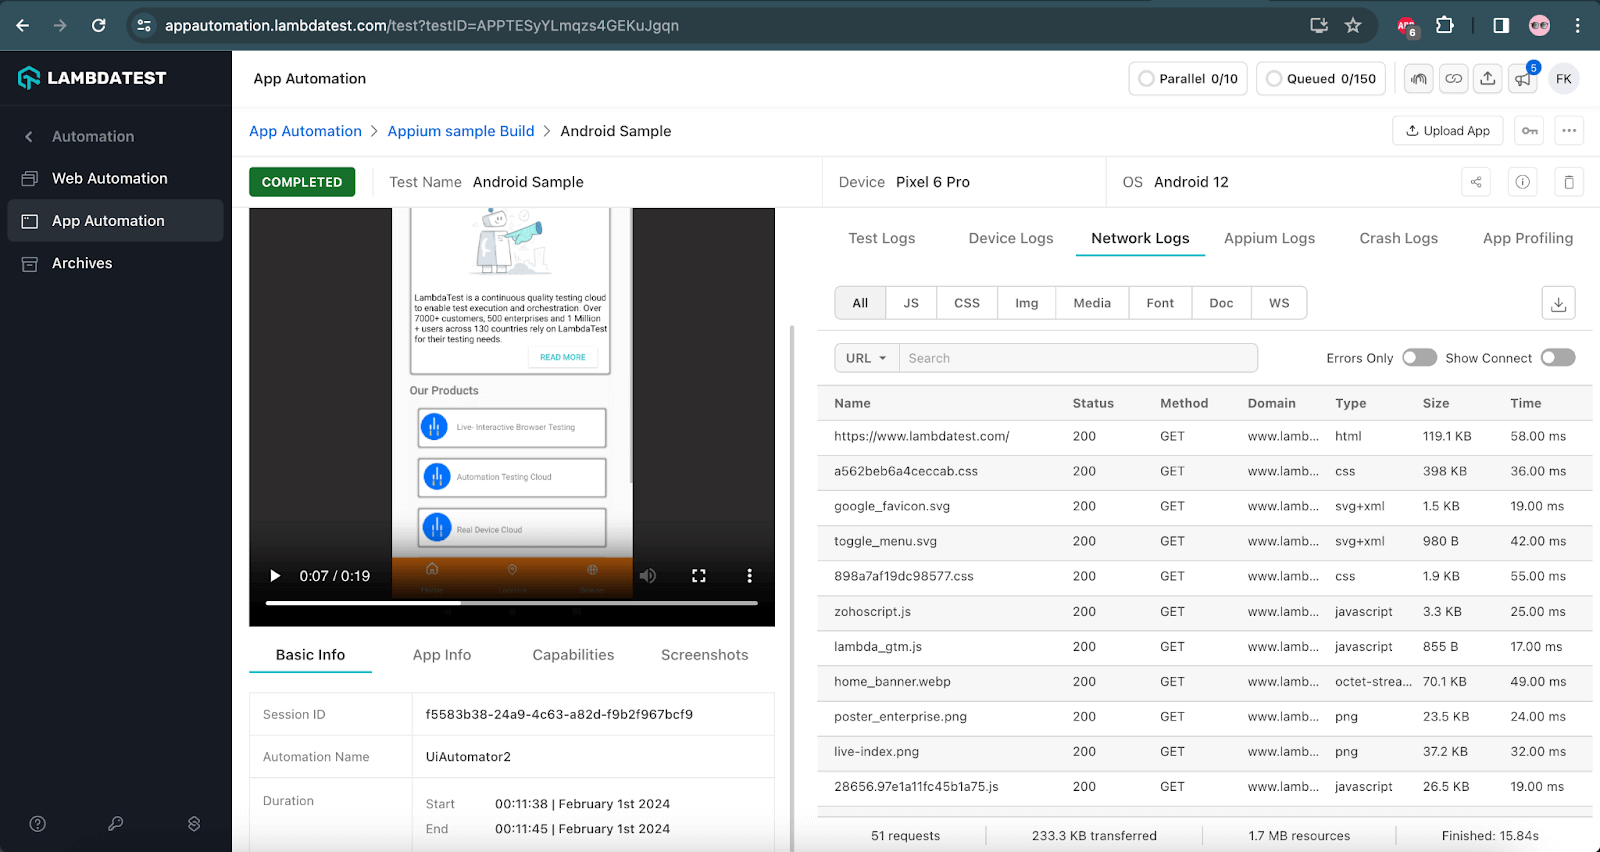
Similarly, you can see the network logs of the tests by clicking on Network Logs as shown below
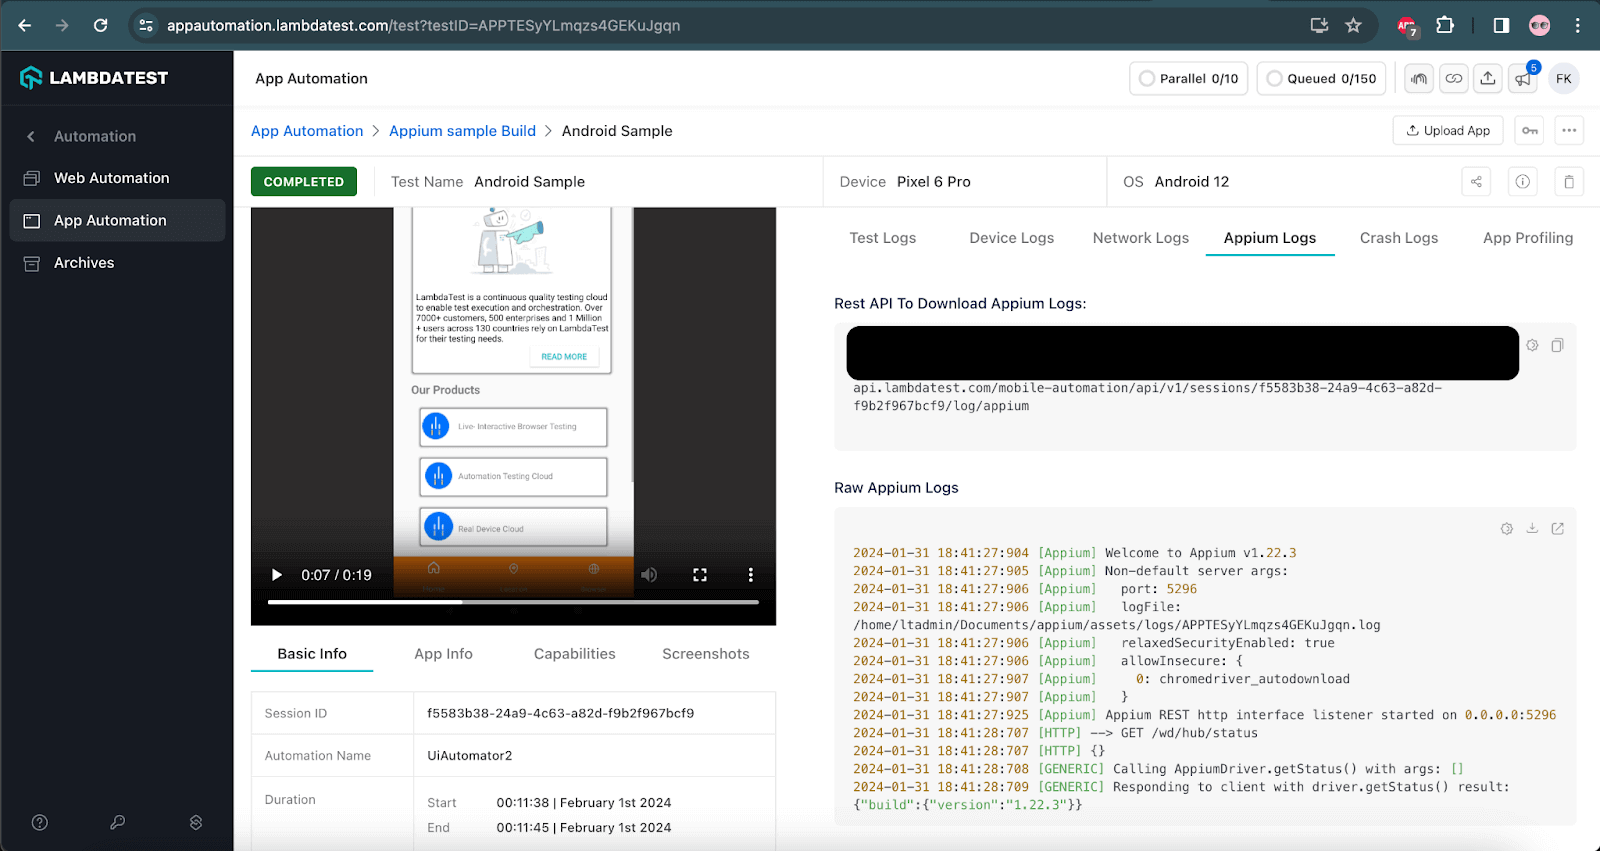
And similarly, you can see the Appium Server logs from the cloud server by clicking on the Appium Logs tab as shown below:
You can also validate your Appium automation expertise with Appium 101 certification from LambdaTest. This certification allows you to boost your Appium expertise by running tests on real Android and iOS devices.
Limitations of Using Appium
By far, you have learned about how to automate Android apps using Appium, and I believe you should be able to start automating the Android mobile application using Appium. However, knowing the challenges faced while using Appium is also necessary.
- Complex Setup Process: The Appium setup process is quite complex, and beginners, especially people with less programming skills and knowledge, might face many challenges.
From installing Node.js to Appium CLI, then Appium Inspector for finding the mobile locators, and then installing the required Appium Driver can all be a complex and time-consuming process if you are a beginner and don’t know how to begin with Appium mobile automation.
- Locator Challenges: The mobile locators are different from the web locators. The other problem is there are different locators for Appium. Though there are some common locator strategies, testers need to be familiar with the locator strategies for the platform they need to automate the tests.
- Requires Intermediate Programming skills: Appium is not a low code or scriptless automation tool. Good programming skills are required for working with Appium, which could be a barrier for non-technical folks.
- Heavy Maintenance: Appium relies heavily on the programming skills required to write, update, and maintain test scripts. It becomes challenging when automating large projects where test scripts need continuous maintenance, which results in increased costs.
- Doesn’t Support Accessibility Testing: Appium, at the core, focuses on functionality testing and does not provide the same level of support for accessibility testing.
- Minimal Support for Performance Testing: Appium primarily focuses on functional and UI testing. Some areas of CPU utilization, memory consumption, and battery usage can be monitored and tested using Appium. So, it has minimal support for performance testing.
As XPaths are not recommended in mobile automation, it becomes another challenge for web automation testers who have just started working with Appium and relied very heavily on XPaths while working with web automation.
Run your Appium tests on virtual and real device clouds. Try LambdaTest Now!
Common Errors and Troubleshooting Steps in Appium
In this blog section on how to automate Android apps using Appium, we look at common errors that testers face while performing Android application testing and how to troubleshoot them.
| Error | Troubleshooting Steps |
|---|---|
| “org.openqa.selenium.SessionNotCreatedException: A new session could not be created.” |
|
| org.openqa.selenium.SessionNotCreatedException: Could not start a new session. Possible causes are an invalid address of the remote server or browser start-up failure. | Check if the Appium Server is started and running in the background. |
| org.openqa.selenium.SessionNotCreatedException: Could not start a new session. Response code 500. Message: An unknown server-side error occurred while processing the command. Original error: Avd ‘Pixel_6_Pro’ is not available. | Check if the emulator/simulator or the real mobile devices are started and running before the test is executed. |
| The following desired capabilities are required but were not provided: deviceName platformName. | Add desired capabilities for deviceName and platformName in the Appium test script. |
| Could not find adb. Please set the ANDROID_HOME environment variable with the Android SDK root directory path. | Set the SDK root directory path in the System Environment Variables. |
| org.openqa.selenium.SessionNotCreatedException: Could not start a new session. Possible causes are an invalid address of the remote server or browser start-up failure. |
For example, in Appium Server, the URL is http://127.0.0.1:4723.But in the test script, the remote URL is provided as |
| Encountered internal error running the command: Error: Appium Settings app is not running after 30000ms | This may be due to the delayed start of the emulator/simulator or real mobile device. To fix this, just rerun the test, making sure that the emulator/simulator or device is up and running before you execute the tests. |
Best Practices to Automate Android Apps
To automate Android apps, you can follow these practices that ensure successful outcomes and efficient development processes:
- Define Clear Testing Scope: Begin by understanding and setting achievable testing goals. This sets the right expectations across teams and ensures everyone is on the same page regarding the testing objectives.
- Select the Right Framework: Choose an appropriate testing framework based on the project’s requirements. Consider factors like app complexity and features before opting for a framework. Avoid the common mistake of selecting a popular tool that may not align with your project needs.
- Prioritize Real Devices: Test on actual Android devices is crucial. Android emulators fail to replicate real user conditions, such as battery life, calls, and network issues. Use real device cloud, offering access to a wide range of Android devices for more accurate and comprehensive testing. You can also refer to these Android device statistics to select the right devices for testing.
- Enforce Scripting Standards: Consistent scripting practices, along with well-commented and adequately indented code, play a pivotal role in maintaining readability and collaboration among team members.
- Stay Updated with OS Changes: Android frequently releases OS updates. Ensure your automated test cases are adaptable to these changes, maintaining the compatibility and effectiveness of your tests.
- Measure Automation Impact: Gauge the success of your automated testing efforts through essential metrics. These metrics provide insights into the efficiency and reliability of your automated testing process. For this, you can leverage observability platforms like LambdaTest Test Analytics that provide insights into your tests with metrics such as test case health summary, test summary, test trends, and more.
- Differentiate from Manual Testing: Remember that automated and manual testing serve distinct roles in the development cycle. Avoid comparing them directly, as each contributes uniquely to the testing strategy.
- Debugging: Effective debugging is crucial for identifying and resolving issues. To identify and address failed tests, utilize comprehensive test reporting, screenshots, videos, and text logs.
By implementing these straightforward yet essential best practices, you can enhance the quality of your Android applications, streamline your development workflow, and ensure a positive user experience. Embrace these guidelines to make the most of Android automated testing and drive your app development journey to success.
Conclusion
To conclude and recap this Appium tutorial on how to automate Android apps using Appium, we learned about running Appium tests on an Android device on your local machine and the LambdaTest cloud platform.
We also learned how to use the new Appium v2 for automation, setting up our machine, setting up the required drivers, automating a hybrid app, and interacting with different elements like a button, text field, and WebView. This example is enough for you to get started with Android automation and automate any type of application you may work on in the future.
If you liked this blog on how to automate Android apps using Appium, don’t forget to share it with your network, who may also benefit from it and help them learn about Appium.
Frequently Asked Questions (FAQs)
How do you automate apps on Android?
There are several ways to automate Android apps:
- Using Appium
- Using Espresso
- Using UI Automator
Each method has its advantages and challenges, and the choice of method depends on the specific requirements of your testing scenario.
Which programming languages are supported by Appium?
Appium supports the following programming languages:
- Java
- Python
- JavaScript
- Ruby
- C#
What is an Appium Inspector?
It is a desktop-based application that can connect to a local Appium Server session and help find the mobile element locators for Android and iOS applications.
What is the default server and port number for Appium?
Appium’s default server address is 127.0.0.1, and its default port is 4723.
Does Appium allow automation of system apps?
Yes, Appium does allow the automation of system apps on both Android and iOS devices
Author
Wasiq Bhamla
Wasiq is a Test Automation specialist having more than 15 years of experience in Manual and Automation testing. He has vast experience in automating Desktop, Web, API, Android, and iOS based applications. He is also an active open source contributor on GitHub, a freelancer, a mentor, and a blogger.
Blogs: 7


