
KaneAI - Testing Assistant
World’s first AI-Native E2E testing agent.

How To Install TestNG In Eclipse: Step By Step Guide
Kritika Murari
Posted On: July 27, 2020
This article is a part of our Content Hub. For more in-depth resources, check out our content hub on A Detailed TestNG Tutorial.
As you already know, TestNG or Test Next Generation is one of the most frequently used automation testing frameworks in Java. Inspired by JUnit and NUnit, Cedric Beust created TestNG with the idea of covering almost all types of testing models, be it functional or end-to-end. The annotations, functionalities, usability, features, and ease-of-use make TestNG a very popular choice of framework. Using TestNG Annotations for Selenium completely depends on your business requirements. Listed below are some of the major benefits of using TestNG for Selenium automation testing–
- Reporting feature provides a detailed XML report of every successful, failed or skipped test.
- Parallel testing assists testers in running multiple test cases with the added benefit of CI/CD integration.
- Annotations feature allows developers to handle exceptions and understand the code easily.
- Test cases can be grouped together or prioritized easily.
- Flexible runtime configuration.
In this article, you will learn how to install TestNG in Eclipse and set it up in your system to start building a framework for your test project. Starting off with the installation of the TestNG plugin for Eclipse.
TestNG is based on Java and you need to install it in case you haven’t already. Now to begin with the installation of TestNG plugin for Eclipse, you need to launch Eclipse IDE and then follow these steps.
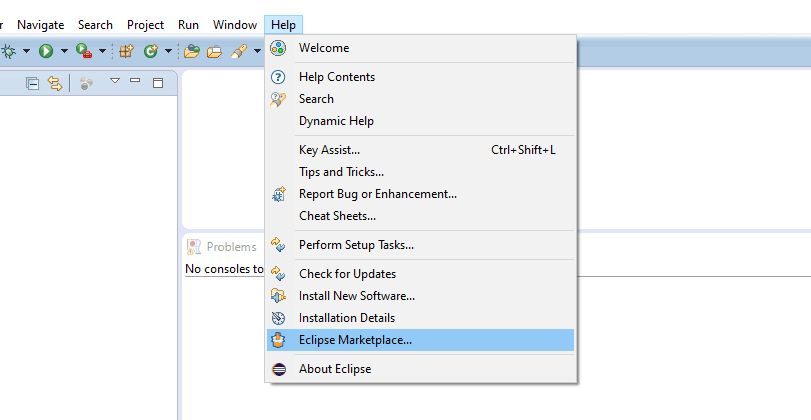
Step #1: Once Eclipse is launched, click on Help and then Eclipse Marketplace.
Step #2: A new window would open up, wherein you need to type “TestNG” in the Find text box and click on the Go button.
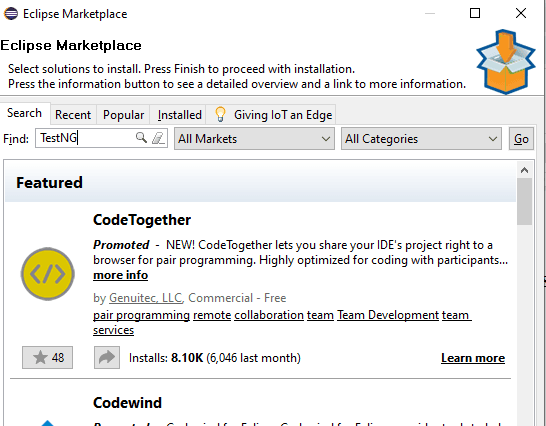
Step #3: You will now see the search results with TestNG for Eclipse at the top. All you need to do now is click on the Install button next to it.

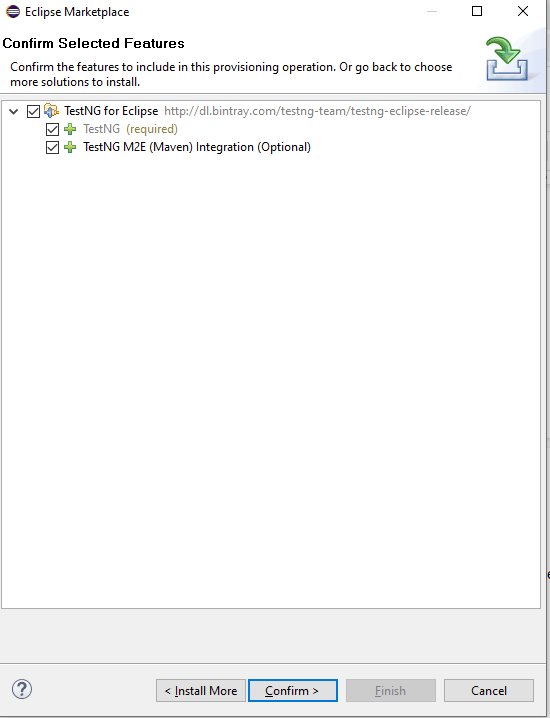
Step #4: Resolving of features might take up a few minutes after which you need to verify that the checkbox for TestNG is checked and click on the Confirm button.
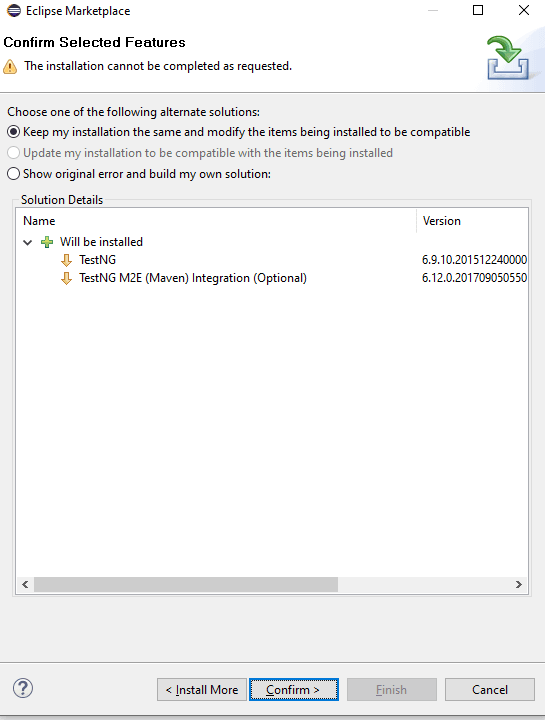
Step #5: Select “Keep my installation the same” option and again click on the Confirm button.
Step #6: Accept the license and click on the Finish button.

Note: For the change to be effective, you will have to restart Eclipse and you will now be able to see TestNG installed by right-clicking on any project and seeing TestNG in the menu options.

Did you see how easy this process was?

Can’t Find TestNG Plugin In The Eclipse Marketplace? Do This
In some versions of Eclipse, you might not find the TestNG plugin in the Eclipse marketplace. You can still install TestNG in Eclipse.
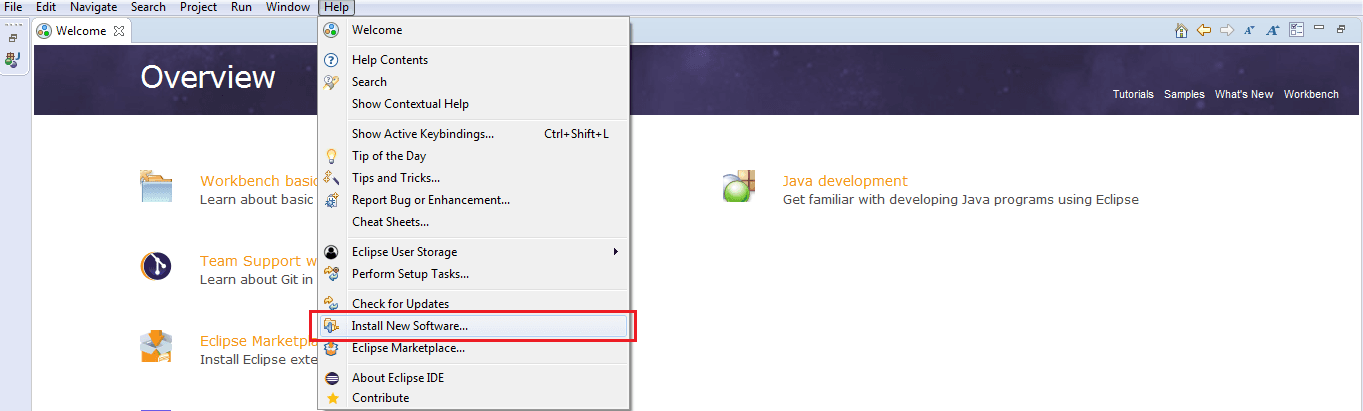
Step 1: Go to Eclipse help and click on the button to “Install New Software”.
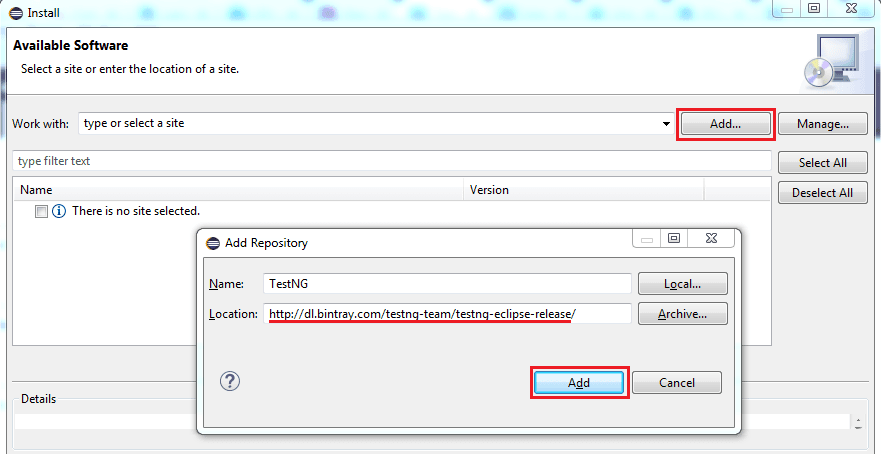
Step 2: Click the Add button and type “TestNG” as name and “http://dl.bintray.com/testng-team/testng-eclipse-release/” as a path.
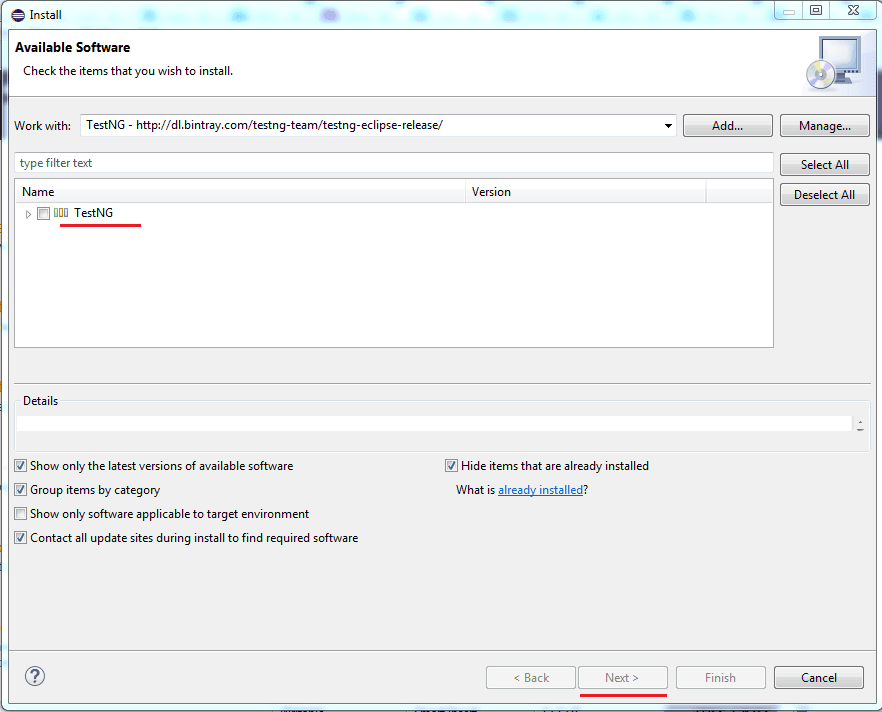
Step 3: Once you add the Path, you will notice a TestNG entry under the name. You then need to select that and click on Next to install TestNG in Eclipse. Accept the license agreement and hit the Finish button.
It is greyed out in this image because I already have it installed. Don’t worry though, it will work for you perfectly. 🙂
With TestNG certification, you can challenge your skills in performing automated testing with TestNG and take your career to the next level.
Here’s a short glimpse of the TestNG certification from LambdaTest:
Don’t Want To Install TestNG With Eclipse? Use Local Library File
If you do not want to install TestNG Eclipse or TestNG with IntelliJ, there is another way you can add TestNG to your project. It is by downloading the library file in your system and then manually adding it to the build path of the project where you want to use it. It is quite similar to the method we used above, the only difference being we will be first downloading the library file to our system and adding it to the build path later. We recommend installing the TestNG plugin for Eclipse rather than manually adding it to the build path as you will have to manually add it to every project. On the other hand, if it is installed in Eclipse you won’t have to go about configuring the build path again and again. Let us quickly see the steps you would need to follow to –
- You can download the TestNG lib file from here.
- Once the zipped file is downloaded, copy it to a location of your choice. I have added it at below path in my system-

- Now , open Eclipse and click on Help in the menu bar and click on Install New Software.
- Click on Add and give name as TestNG and the path where you stored the zip file in the location field and click on OK.

- Select TestNG and click on Next.

- Just click on Next if you get any Remediation or Install Details page. Accept the license and click on Finish.

- Restart your Eclipse.
- Once done you need to add the library to the project build path. Right click on your project and go to Build path and in the new pop-up window click on Add Library.

- You will see TestNG as an option in the new window, just select it and click on Next.

- Once done you will now see the testNG library under your project structure.

- You can now check if TestNG is ready to be used in your project by simply writing any annotation tag, like @Test in your script. You will see that on hovering on the tag, you get options to import the TestNG package.

And there you go you can see TestNG being configured in your system and all ready to use.
After installing TestNG Eclipse, we might need to convert some of the projects that we created as a regular java project to a TestNG project. Let me quickly brief you about how to do that.

Setting Up TestNG Eclipse Tests From Your Existing Java Projects
Step #1: Converting your existing tests into TestNG tests is a very easy process. Just open Eclipse and right-click on the project you need to convert to TestNG.
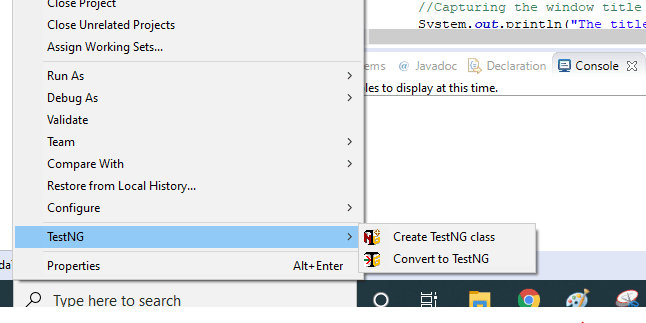
Step #2: Select and click on Convert to TestNG. You will see a refactoring window popping up with the testng.xml details. For now, keep the things as it is and click on Finish. We will discuss testng.xml in detail in further posts. For now, let us see that our Java project is converted into TestNG and a testng.xml is created.


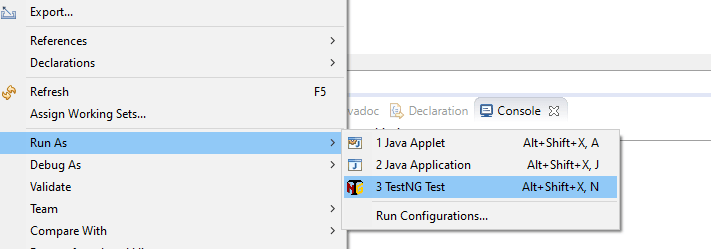
Now you can run the test classes under the project as TestNG tests.
Now that we are done with the installation and set up of the TestNG plugin for Eclipse, we will further talk out about creating our first TestNG project and executing the same in our next post. We will be using Eclipse throughout the TestNG series, although it is completely up to you to run TestNG in Eclipse or any other IDE to write and run your test cases.
Now you can run your first TestNG Selenium script. Happy testing! 🙂
Author
Kritika Murari
A technophile and bibliophile at heart, Kritika loves to experiment with different aspects of Digital Marketing. When not working, you will either find her sketching or backpacking.
Blogs: 31